Creating Tickets-English
From a ticket to a solution.
MGT in a nutshell
One place for all your change and support tickets
Logistics is constantly on the move, literally. The same applies on your logistics software. Whether it's a new customer demand or a new optimization in your processes, chances are you'll want to make changes to your software after implementation. That's when MGT comes into the picture. Thanks to the MGT Connector, you create your support and so-called change tickets directly from your own environment. You do this via 'Boltrics-request overview' in 3PL Dynamics. Then our consultants will get to work on it!
Support or change?
Via the request overview, you create both your support and change tickets directly in your own software environment. But both follow a different route. As you know, support tickets arrive at Boltrics' support department. These follow the rule of thumb: “anything that worked yesterday and (suddenly) doesn't work today. Other questions, process changes or setting up new modules fall under the 'Change' category.
MGT via 'Boltrics request overview'
To submit tickets to MGT via your own environment, use the MGT Connector. As a result, you can create new tickets from your own 3PL Dynamics environment and find submitted tickets conveniently by navigating to 'Boltrics-request overview'. To create and view tickets this way, you must be known to Boltrics as a core user. In doing so, you must be registered as a Named User in your environment and no shared mailbox must be specified as your contact information.
Note
If you cannot access your 3PL Dynamics, you cannot report this via Boltrics-request overview. In that case, check https://status.boltrics.com/ to see if there is an outage.
Creating Tickets.
Submitting support and change tickets correctly improves your ticket turnaround time.Therefore, we help you get started with a step-by-step explanation of the different fields and categories in Boltrics request overview.How do you properly go through the Wizard?And how do you submit the information as efficiently as possible?
Note
When submitting a change ticket, you automatically provide a budget agreement for 1 hour. In this hour, an analysis of the request is done and - if possible - solved immediately. If more time is needed to resolve your request, an approval is requested via 'approval items'.**
Create a ticket using the wizard
To make the creation of a ticket as easy as possible, we offer you a Wizard in which you go through the right steps by means of different fields. Below we explain the fields step by step.
New request
From the role center you navigate to 'Boltrics-request overview'. Here you will find an overview of all (open) requests. Via 'New request wizard' you open the wizard. You start the creation of a new ticket via the screen you see below.
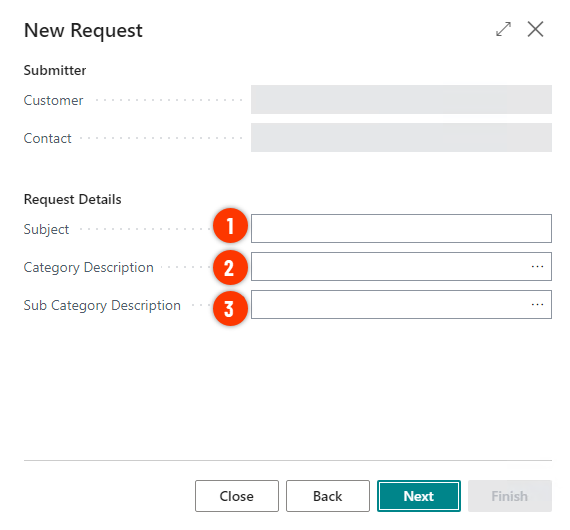
Important fields:
1.Description: The description of the ticket
2.Category: Choose the appropriate category that fits your ticket. Choose from:
- SUPPORT for support reports
- CHANGES for general changes
- EDI for data integration related changes.
3.Subcategory: Under each category there are several subcategories. These are important for correct assignment - and thus for fast follow-up. Choose the right subcategory here, appropriate to your question.
Click 'Next' in the wizard to continue creation.