Scanning Application Documentation
This guide explains how the scanning application is structured, how views are built, and how to troubleshoot issues. It covers core concepts, view components (header, lines, actions), CSS attributes and classes, setup, and debugging.
What's New
Current and New Value Session Variable Display
From version 24, the call stack displays both the current and the new value of a session variable, separated by the → character. This makes it easier to see how variables change during execution.
Unlimited Length Session Variables
Session variables can now store text of unlimited length. This is particularly useful when building long filter strings (for example, an Orderpick assignment filter).
Note: For text entries longer than 250 characters, use the
BASE64TEXTCSS attribute.
Core Concepts
To work effectively with the scanning application, it helps to understand the following fundamental building blocks.
View
A view is the current "screen" or interface that the user interacts with at any given moment in the scanning application.
Session Variables
Session variables store data during a scan session. They:
- Have no default value.
- Must be populated from tables or functions.
- Are used to display data or to drive function logic.
Constants
Constants are single values used to filter data sets. They can include:
- Any recognized data type
- Wildcards
- Sub-table numbers
- Values recognized within client filters
Tables
Tables form the foundation of the system and work similarly to spreadsheets:
- They store company data in rows and columns.
- They can be selected as the data source for the current view.
- They allow records to be collected through filters based on session variables, constants, or Y-axis table definitions.
Field Numbers
Field numbers refer to column numbers within tables. They provide the X-axis for table searches.
Custom Lists
Custom lists are tables connected to the current view's working table. They are used to manage related data such as dropdowns, radio buttons, or camera resolution presets.
Related Fields
Related fields reference the field number of custom lists and provide the X-axis on related tables.
Actions
Actions are user-generated inputs triggered by:
- Keyboard button presses
- Touchscreen interactions
Codeunits
Codeunits are libraries that contain function sets within 3PL Business Central.
Functions
Functions are code segments that can:
- Collect data from different tables
- Fill and manipulate variables
- Perform calculations
Criteria Function Sets
Criteria function sets determine whether another function should be executed. They act as conditional logic (if/then).
Key Codes
Key codes are integers that identify physical key presses, for example:
| Key Code | Key |
|---|---|
| 112 | F1 |
| 113 | F3 |
| 13 | Enter |
| 134 | F23 |
| 135 | F24 |
CSS Attributes
CSS attributes define object properties such as layout and appearance. They are mandatory for the HTML5 platform and range from simple horizontal lines to fully featured datatables.
Scan Barcodes with Your Mobile Phone
The CSS attribute BARCODE enables barcode scanning directly through a mobile device. When applied, the phone's camera is repurposed from taking photos to actively scanning barcodes, allowing barcode data to be entered seamlessly into the application.
This streamlines workflows such as scanning delivery stops from a loading list, without the need for specialized hardware. It is optimized for scanning individual barcodes; for scenarios involving many densely packed barcodes, a traditional laser scanner may still be preferred. Supported Barcodes: 'qr_code', 'ean_13', 'code_128'
CSS Classes
CSS classes define object formatting, including:
- Font size
- Font color
- Other styling properties
View Process Flow
The diagram below illustrates the code and function execution flow within a view.
Execution Sequence
- Table Filtering — The system applies filters to the selected table using the criteria in the Table Where field.
- Header Execution — Functions in the page header are executed, and the codeunit specified in Execute Codeunit is run.
- Line Processing — Functions placed on each line are executed, and field values are collected (if specified).
- User Interaction — The system pauses and waits for either:
- A user-generated input (action), or
- An automatic postback (defined in the header).
- Action Processing — Functions attached to the action are triggered.
- For a datatable row selection, the next view is defined in the header.
- For a physical button press, the next view is defined in the No. field.
- View Generation — The system generates the next view and the process restarts.
Detailed View Components
Now that the basics are covered, the next sections examine the components of a single view in detail: the header, lines, actions, and app properties. Some areas overlap; where that happens, the component is referenced in subsequent sections but explained in full only on its first appearance.
The Header
The header section of a view contains several important configuration options.
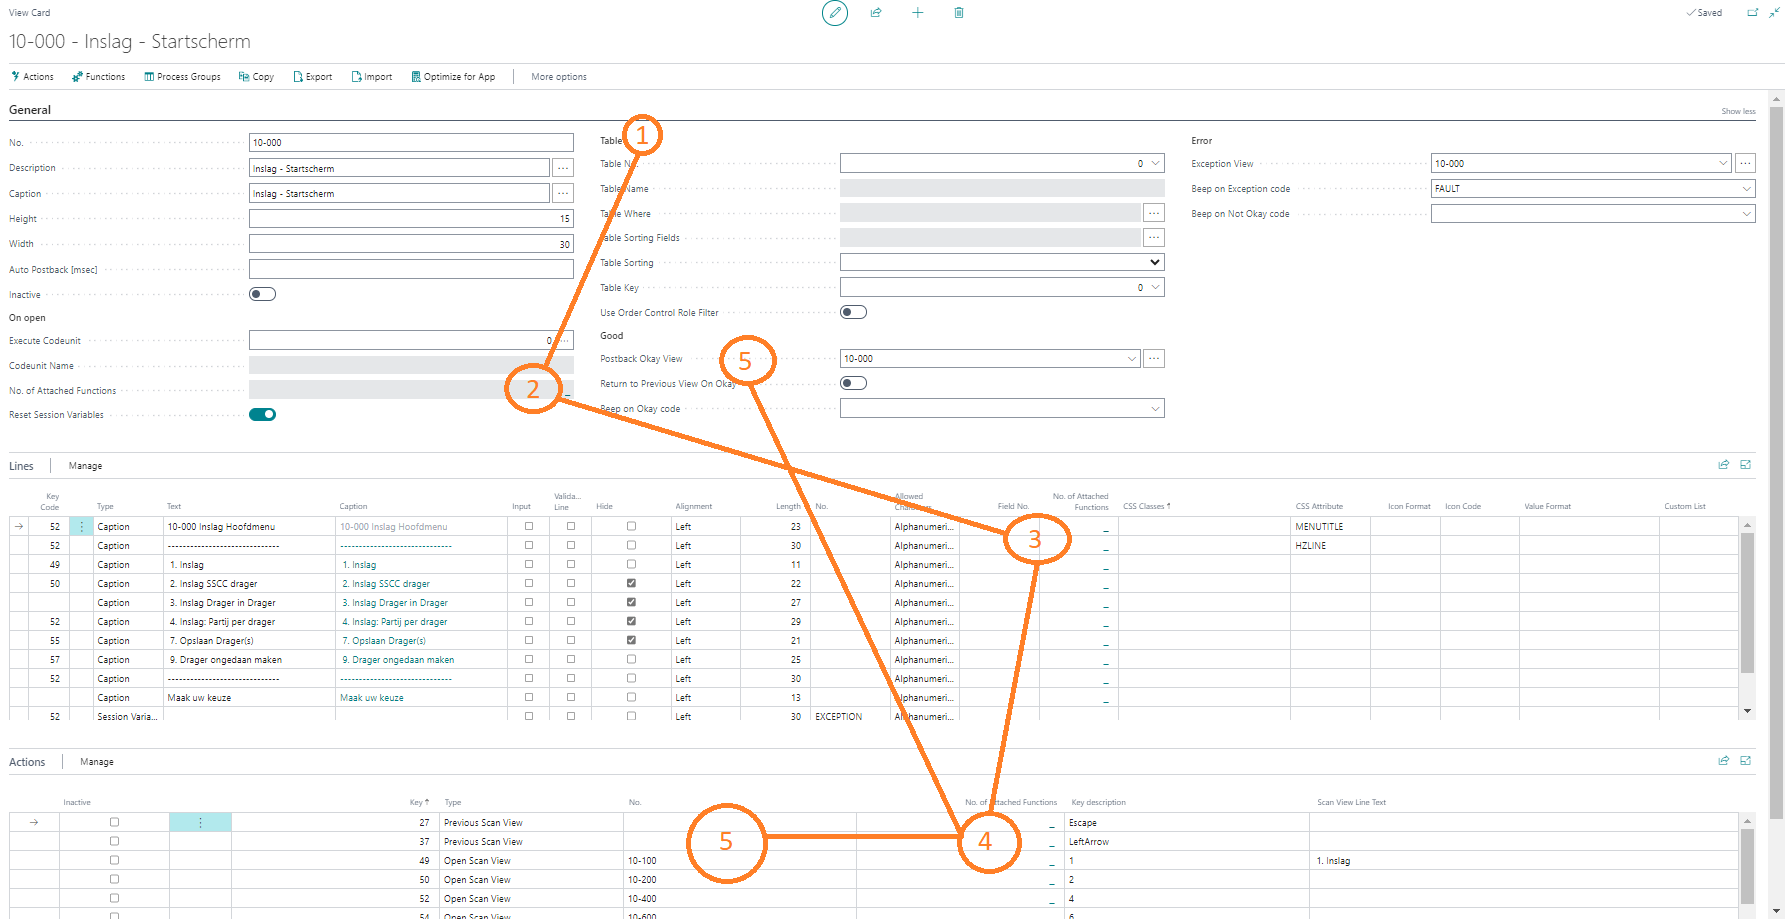
Overview
The header configuration includes both simple and complex settings. The image below shows the general layout of all header fields.
1. Number of Attached Functions
Functions can be executed before a view's lines are loaded. This is particularly useful for resetting variables.
Example: When a user returns to a view multiple times to perform related tasks, you may want to reset some variables while retaining others.

Best Practices
- Use attached functions in conjunction with criteria function sets.
- The header is the only place where a view can be redirected automatically without user interaction.
- Combine attached functions with criteria function sets to build loops (for example, a Do... Until = x construction).
- Use function 46 in codeunit 11155090 for automatic redirection.
- Use the ribbon functions for efficient function management:
- Copy Scan Function — Copy functions from other views.
- Copy Scan Function Line — Copy functions within the same function list view.
- Up/Down arrows — Reposition functions within the same view.
- Update parameter button — Refresh function parameters for existing functions.
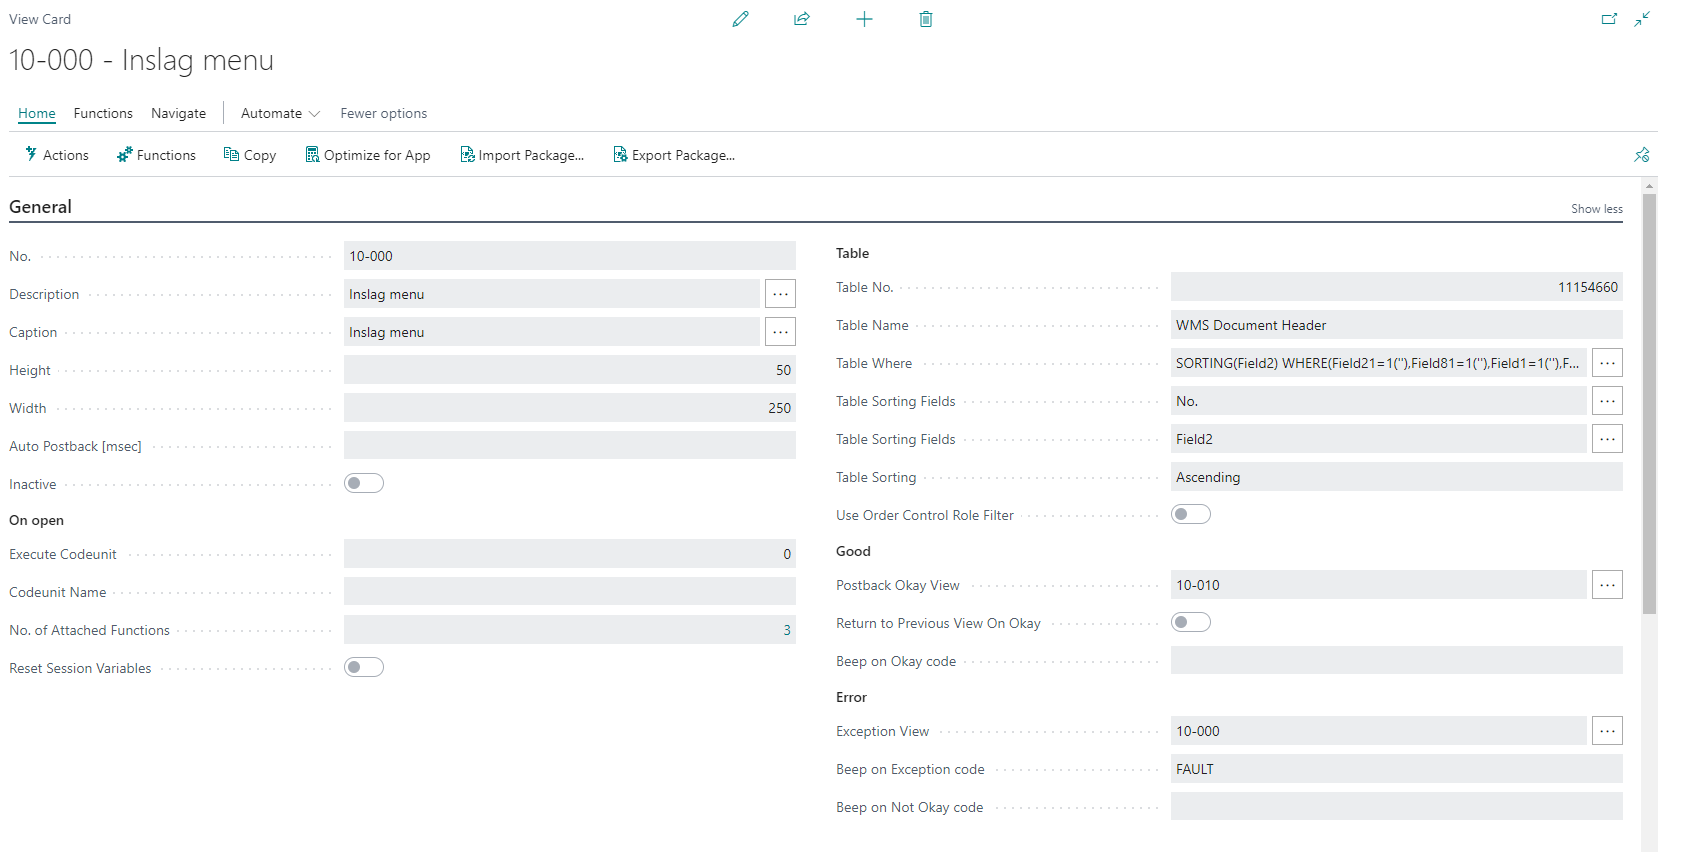
2. Table Where
The Table Where section allows you to set filters on the selected table (defined in the Table No. field).

Configuration Options
| Option | Description |
|---|---|
| Field No. | Column number of the referenced table. Example: No. 81 refers to the status code column in table 11154660 (Doc. Header). |
| Type | Sets the value type to determine which columns to fill next. |
| Column No. | Uses the type variable value to create dynamic filters. Example: When logged in as "Boltrics", USERFILTER is set to "Boltrics". Setting a filter on column Orderpicker (98) in table 11154660 retrieves records where Orderpicker equals "Boltrics". |
| Prefix | Adds a set value in front of a variable. Example: Adding ' '\| as prefix to USERFILTER results in ' '\|Boltrics. |
| Postfix | Adds a set value after a variable. Example: Adding \|' ' as postfix to USERFILTER results in Boltrics\|' '. |
| Operator | Defines comparison logic: = (equals), <> (not equal), > (greater than), < (less than). |
| Constant Value | Value to evaluate against. |
3. Table Sorting Fields & Table Sorting
Use these fields to configure sorting on specific columns.
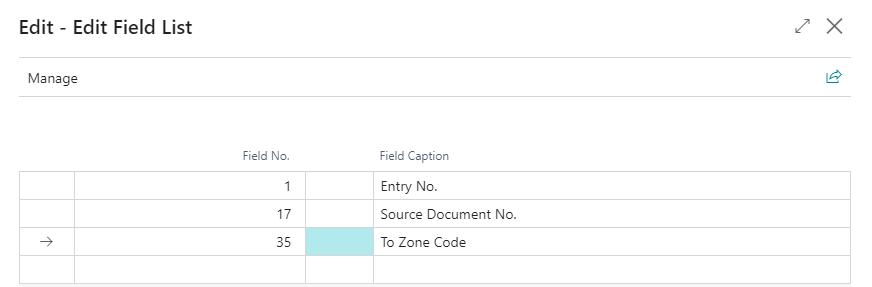
Sorting Configuration
- Set the sorting method on columns (for example, Entry No., Document No., To Zone Code).
- Set the Table sorting field to activate sorting.
- Sorting affects:
- The order of the data repeater display.
- The order in which field values are retrieved.
- Multiple sort levels can be combined, for example:
- Primary sort on Entry No.
- Secondary sort on Document No.
- Tertiary sort on To Zone Code
Lines
The following sections describe line properties, starting with a general overview followed by the specific components.
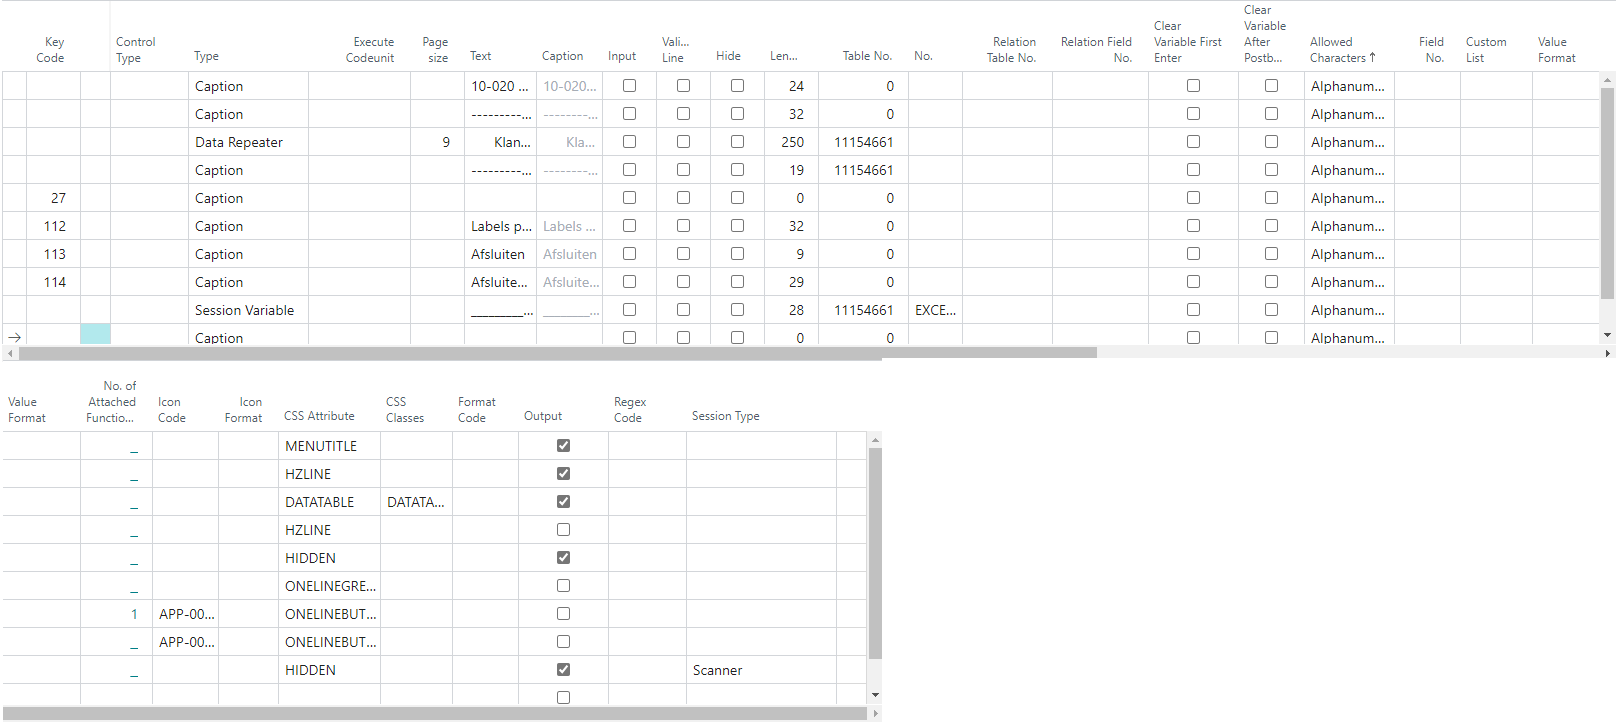
Line Overview
The line configuration includes various properties that control display and behavior. Refer to the field captions for detailed information on each property.
Key Code Configuration
Key codes define the relationship between buttons and actions.
Note:
- Set key code 13 (Enter key) on an empty line at the bottom of the view.
- Duplicate key codes are not allowed.
Data Types
The system supports four main data types:
| Data Type | Description |
|---|---|
| Data Repeater | Creates a table within the current view. Requires a codeunit and a table definition. |
| Caption | Displays static values or text. Supports CSS attributes (for example, HZLINE for a horizontal line). |
| Session Variable | An empty container for value assignment. Values are set through functions or fields. |
| Field | Retrieves values from table columns based on the active filters and sorting settings. |
Data Repeater Configuration
Data repeaters create table views inside the current view.
Setup process:
- Select the Data Repeater line.
- Click Data Repeater in the ribbon, or press
CTRL+D. - Configure the repeater view:
Type options:
| Option | Description |
|---|---|
| Numbering 1.. | Sets key codes 1–9 for lines. |
| Numbering F1... | Sets key codes F1–F9 for lines. |
| Numbering A.. | Sets key codes A–I for lines. |
| Text | Sets default text in the Text Part field. |
| Session variable | Uses a variable for value assignment. |
Text
Sets the text of the current line. Part of the text can be replaced with a variable's value by placing an underscore placeholder (__________) separated from the rest of the text by a space.
Multi-Language Support
Although not immediately obvious, you can set translations for each line. Click the three dots (...) next to the Text field and enter a translation for each available language code. The list of available languages is configured in the scan setup.
Input
Declares that a line should be expanded with an input field.
Note: Use this in combination with an underscore (
_) in the Text field so the input field has a placeholder location.
Relation Table No. & Relation Field No
The illustration below shows how the relation fields work.
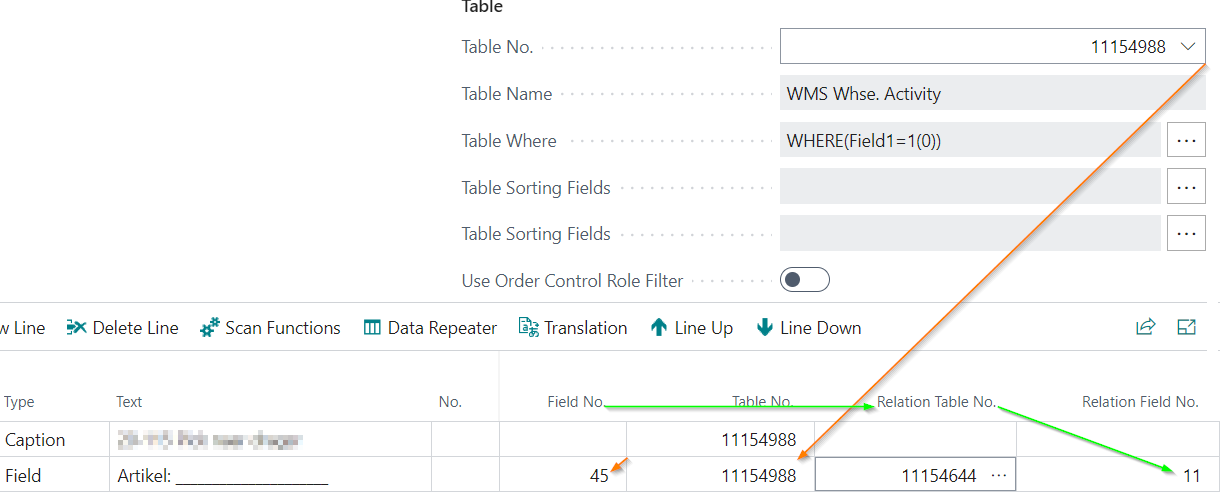
In this example, the table set in the header is table 11154988. Because the line's data type is a field, the value on that line can be used to look up another value in a different table.
For instance, column 45 corresponds to the WMS Customer Item record on table 11154988. Because field 45 is tied to the WMS Customer Item table (11154644), the retrieved record can be used to look up a related value — in this case, column 11, which is the item description. This value can also be stored in a variable by filling the No. field on the line.
Custom List
Custom lists are used to create dropdowns, radio buttons, and to configure camera resolution presets.
To create a custom list:
Add a new custom list:
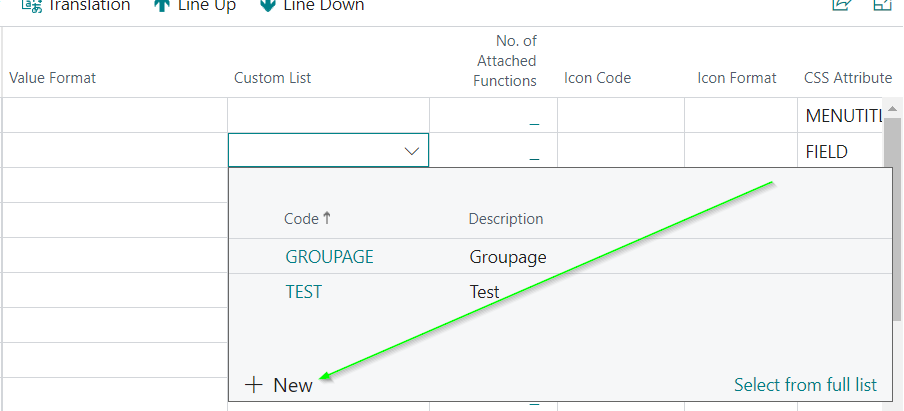
Enter a code that best describes your list. In this example, the list represents a satisfaction rating for this guide, so it is named
ApprovalList:
Add values to the list via the ribbon:

In the new view, configure the Code, Description, and display order for each entry:
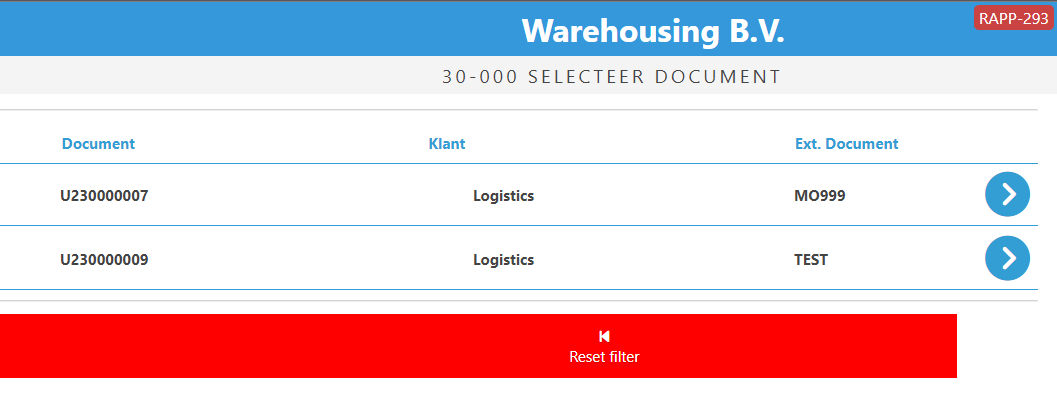
The final result in the scanner looks like this:

CSS Attribute
The following CSS attributes are currently available:
| Attribute | Description | Dependencies |
|---|---|---|
| BASE64TEXT | Converts the value of the session variable to a BASE64 text string. | None. |
| CAPTION | Sets the information to a caption formatting style. | None. |
| CAPTIONCENTER | Sets the information to a caption formatting style and centers it on the page. | None. |
| CUSTOMITEMIMAGE | Retrieves the item's image from the database and presents it in the view (if available). | Data type must be Session variable. |
| DATATABLE | Sets the line to display a datatable. Mandatory to use a data repeater. | Data type must be Data repeater. |
| FIELD | Sets the line to hold a value defined by a field object data type. | Data type must be Field. |
| HIDDEN | Hides the line. | None. |
| HTML | Parses HTML code and presents it on the scanner. | Data type must be Session variable. |
| HZLINE | Creates a single horizontal line across the view. | Text field must contain -. |
| INPUTBUTTON | Creates a blue, clickable button on touchscreen devices. Size can be set in the Value Format field. | Key code bound to the line. |
| LINKBUTTON | TBD | TBD |
| MENUTITLE | Sets the header formatting of the view. | None. |
| MENUWITHMAX | Broad menu button with blue/white formatting. Each line takes up a full line in the view. | Key code bound to the line. |
| ONELINE | Creates clickable text. | Key code bound to the line. |
| ONELINEBLACKBUTTON | Creates a black, clickable button on touchscreen devices. Size can be set in Value Format. | Key code bound to the line. |
| ONELINEBUTTON | Creates a blue, clickable button on touchscreen devices. Size can be set in Value Format. | Key code bound to the line. |
| ONELINEGREENBUTTON | Creates a green, clickable button on touchscreen devices. Size can be set in Value Format. | Key code bound to the line. |
| ONELINEREDBUTTON | Creates a red, clickable button on touchscreen devices. Size can be set in Value Format. | Key code bound to the line. |
| PHOTO | Enables the camera function on supported devices. | Data type Session variable, input enabled, bound to key code 134 (F23). Processed with codeunit 11155091, function 100. |
| PHOTOLINE | Allows multiple files and pictures to be uploaded to the server in a single push. | Data type Session variable, input enabled, bound to key code 134 (F23). Processed with codeunit 11155091, function 100. |
| PROGRESSBAR | Displays a timer/progress bar across the view. | TBD |
| RECORDLINKIMAGE | Retrieves a picture from a record link and displays it. | Data type must be Session variable or Field. |
| RECORDLINKIMAGETHUMB | Retrieves a picture from a record link and displays it as a thumbnail. | Data type must be Session variable or Field. |
| SESSIONVAR | Sets the line to hold a value defined by a session variable object data type. | Data type must be Session variable. |
| SESSIONVARGREEN | Displays the text on the line in green. | Data type must be Session variable. |
| SESSIONVARRED | Displays the text on the line in red. | Data type must be Session variable. |
| SIGNATURE | Generates a large input field that enables signatures to be captured. | Data type Session variable, input enabled. Processed with codeunit 11155091, function 100. |
| SPEECH | Translates the line text into an audio message. | TBD |
| SQUAREINPUTBUTTON | Creates a square, blue, clickable button on touchscreen devices. | Key code bound to the line. |
| TABLE | Enables the creation of tables, useful for displaying pictures with accompanying descriptions. | Columns are separated by \|. |
| TYPEDATE | Displays a calendar from which a variable can be set. | Data type Session variable, input enabled, bound to key code 135 (F24). |
| TYPEDROPDOWN | Enables a dropdown control, based on values in the Custom List field. | Custom list. Data type Session variable, input enabled. |
| TYPEMASKED | Replaces the data entered in the input field with *. Commonly used for password fields. |
Data type Session variable, input enabled. |
| TYPERADIO | Enables a vertical radio control, based on values in the Custom List field. | Custom list. Data type Session variable, input enabled. |
| TYPERADIOHORIZONTAL | Enables a horizontal radio control, based on values in the Custom List field. | Custom list. Data type Session variable, input enabled. |
| UPLOAD | Allows different types of files to be uploaded to a record. | Data type Session variable, input enabled. |
| WARNING | Displays text in red and centers it on the view. | None. |
CSS Class
Refer to the field values for a detailed explanation. Below is a description of one notable class:
RESOLUTION200 — Sets the resolution of a stored photo. A custom list containing the value must also be created, and this only works with the option camera with zoom. It should be used together with the
PHOTOCSS attribute.Note: The final integer value sets the resolution on the horizontal axis of the screen. For example, if a custom list named
RESOLUTION1920(with matching values) is created, pictures will be taken at 1920 pixels on the horizontal axis.
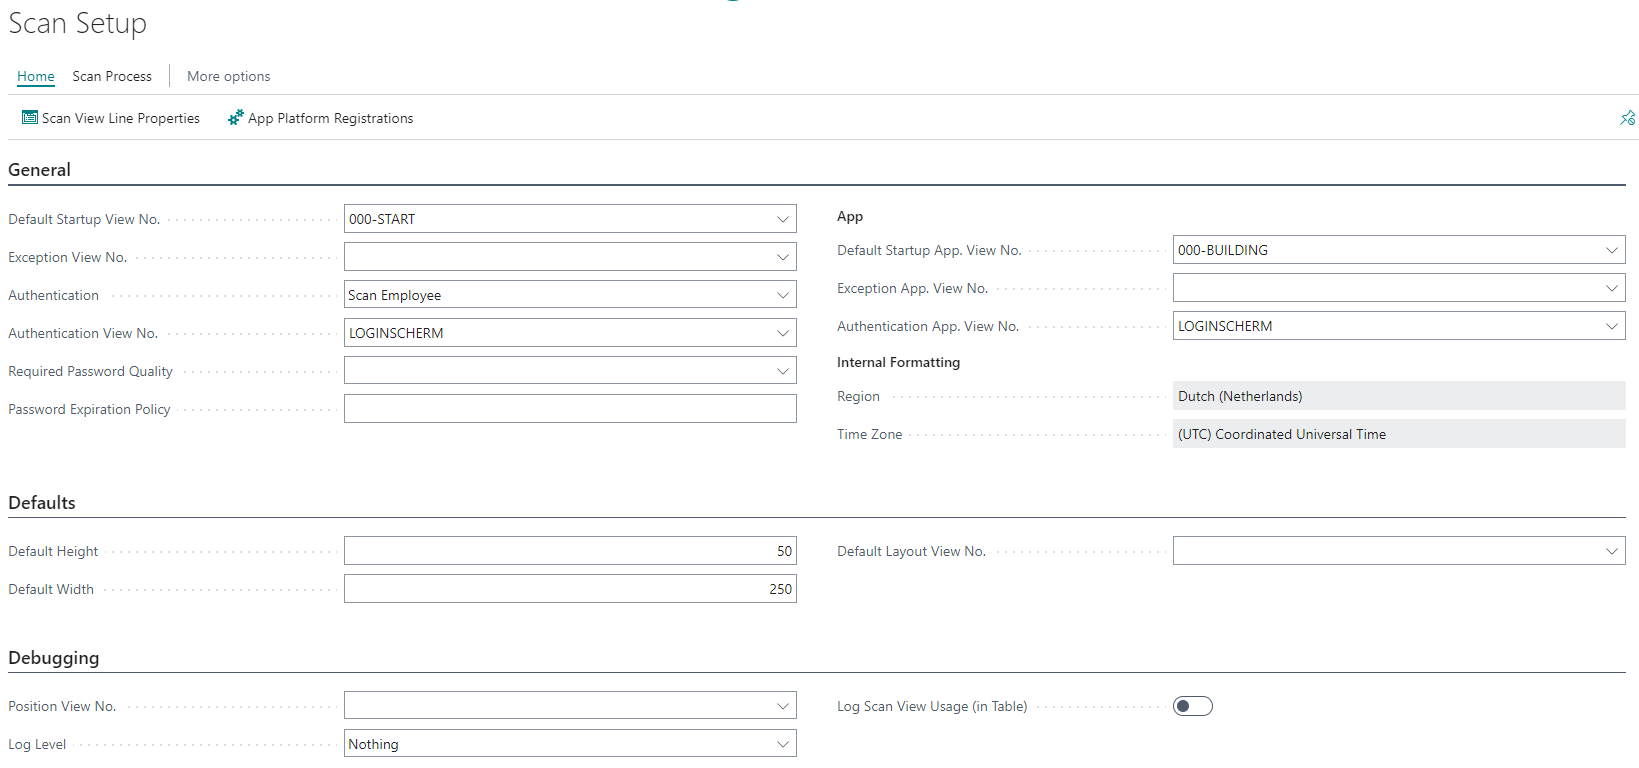
Scan Setup
The Scan Setup page is where most generic configuration information is stored. Refer to the tooltips on the page for detailed information on each field.
Scan Employees
Work in progress.
Debugging an Error Within a View
Errors can occasionally occur on the scanner. To resolve them, it is essential to determine whether the error comes from the client itself (for example, 3PL Dynamics) or from functionality within the current or proceeding view.
The steps below assume a reasonable working knowledge of 3PL Dynamics and of your own processes.
Step 1 — Reproduce in the Client
Before debugging the scan session, reproduce the entire process in the client without using the scanner or emulator. Use the same steps, carriers, locations, and other variables as the user did when the error occurred.
- If the error also occurs in the client, the cause lies outside of the scan environment — investigate the client process itself.
- If the error only occurs in the scanner, continue with the steps below.
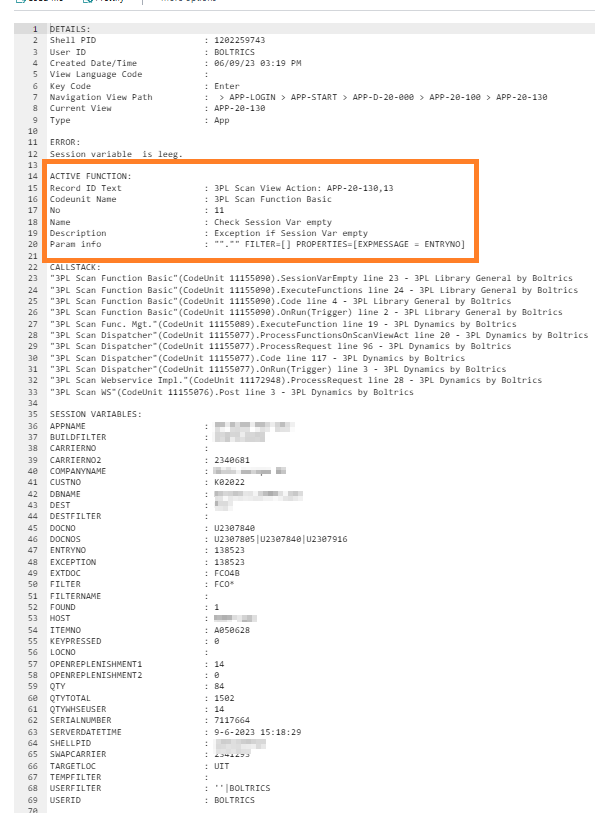
Step 2 — Open the Call Stack
- Navigate to Scan Sessions in the client.
- Select the line that represents the user who received the error in the scanner.
- In the ribbon, select Report > View Call Stack.

Once the call stack is open, you can identify which function triggered the error. Look at the CodeUnit Name, No., and the current view under Active Function.
Step 3 — Locate the Function in the Scan View List
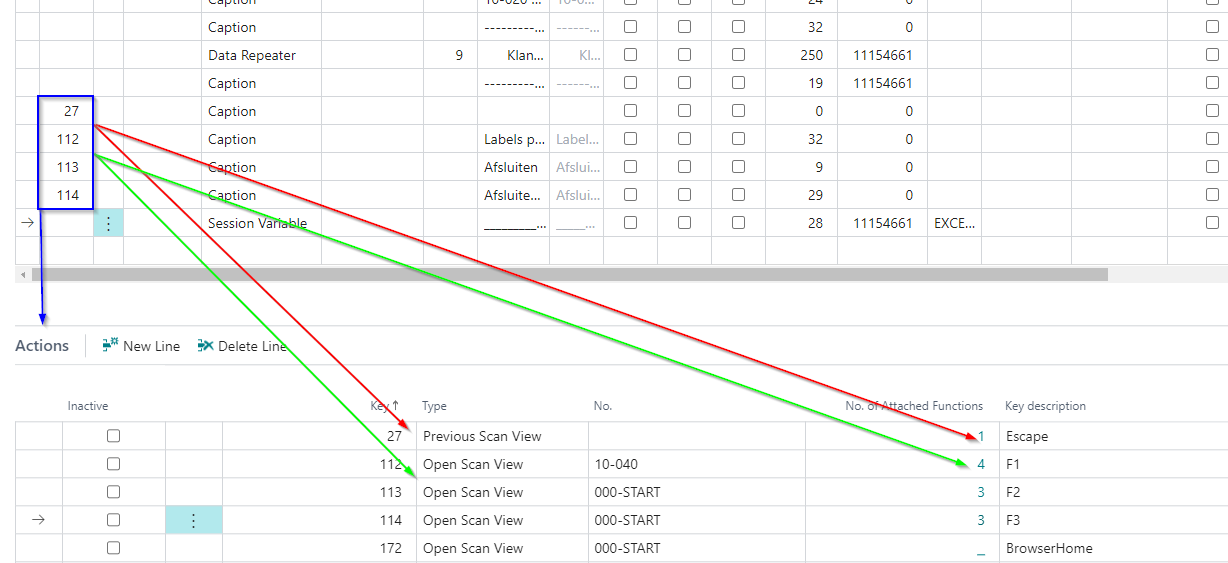
Navigate to Scan View List and find the view in which the error was triggered. The failing function is always located between the last user-generated input (action) and the next pause.
Example: If the last user action was a barcode scan before the error occurred, look for the responsible function between the functions attached to the Enter key on the first view (1) and all subsequent functions on the next view until the code pauses again (2 & 3):
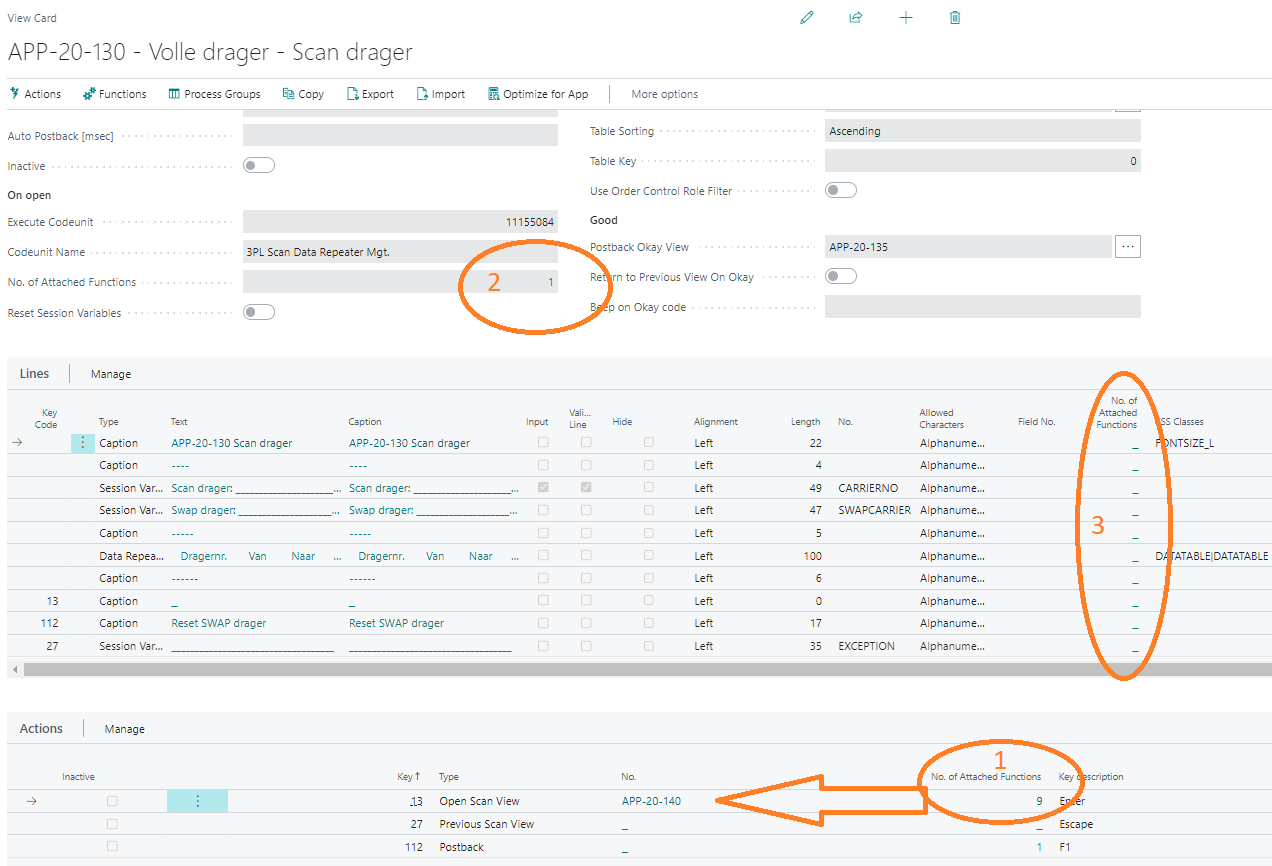
In the example above, the functions marked as 2 and 3 should be found in view APP-20-140, not in view APP-20-130.
Warning: Before proceeding, switch to a non-production environment. The following steps may modify or corrupt data and should not be performed on live data.
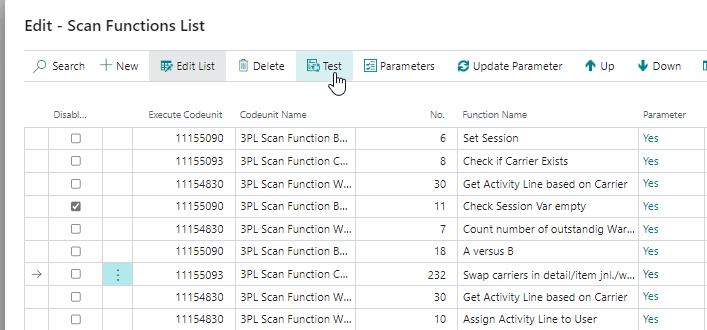
Step 4 — Isolate the Failing Function
To confirm which function fails, force an error directly before the suspected function is triggered:
- Add function 11 from codeunit 11155090 (no parameters required) above the suspected function.
- Re-run the scenario.
- If the error changes, the failing function is further down the flow. Repeat with the next candidate.
- If the error does not change, move the newly created function below the suspected function and retest.
- When the error returns after moving the function down, you have successfully identified the misbehaving function.
Step 5 — Check Function Parameters
Finding the failing function does not necessarily mean you've found the root cause — most functions are fed by (session) variables, which may themselves be the problem.
To check whether the function itself is failing or whether its input variables are the cause, temporarily replace the variables in the function's parameters with constants that represent the data you would expect:
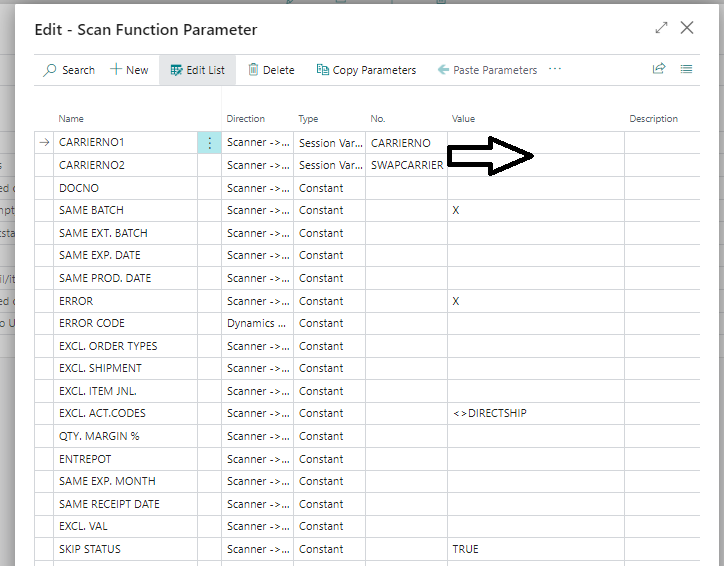
Tip: An input, bidirectional, or output variable can be recognized by the direction column. The arrows
-->,<-->, and<--indicate the type.
Run the function with these constants:
- No error — The function itself works correctly. The problem lies in its input parameters and, most likely, in the (session) variables feeding it.
- Error reproduced — The function itself is the cause.
Step 6 — Inspect Variable Values
The call stack does not always reflect the true state of a variable at the time of the error because variables may be emptied or rolled back by the code. A quick way to inspect an individual variable's value is to pass its name to function 11 (the error-forcing function from Step 4). Remember to place it above the malfunctioning function in the flow.
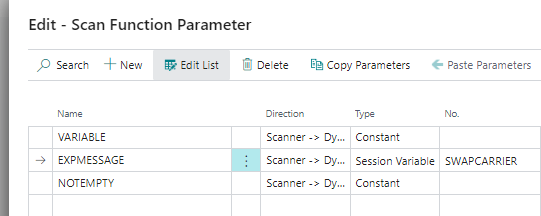
Re-run the scenario and check whether the forced error reflects the data you expect.
- Unexpected value — You have found the responsible (session) variable. Trace the variable backwards through the flow (against the normal execution order), re-testing its value at each point where it is manipulated, until it holds the correct value or you reach its point of origin.
- Expected value — Continue to check the other variables in the function.
If tracing a variable leads to another misbehaving function, the entire process repeats from Step 4 until you reach the root cause.
Importing & Exporting Views
Introduction
Suppose your sales department has just landed a new customer whose requirements are so specific that they don't fit the regular process flows — and adapting those process flows would make them complicated and error-prone. How can you handle the new requirements without building every view from scratch? What if you want to copy one process flow to another, or develop and test views in a safe environment without losing them at the end of the day?
The answer is to import and export your scan views. This small tool saves significant effort by allowing you to back up views, rename them, and recreate them in seconds.
Exporting Views
From the ribbon, click Home > Export Package:
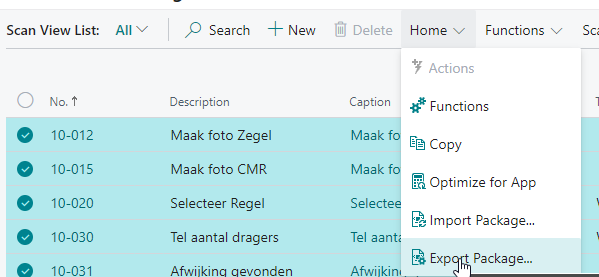
A useful bonus of this method is that you can rename the views on export. Enter the string (or part of it) that you want to replace in Find What, and enter your replacement string in Replace With:
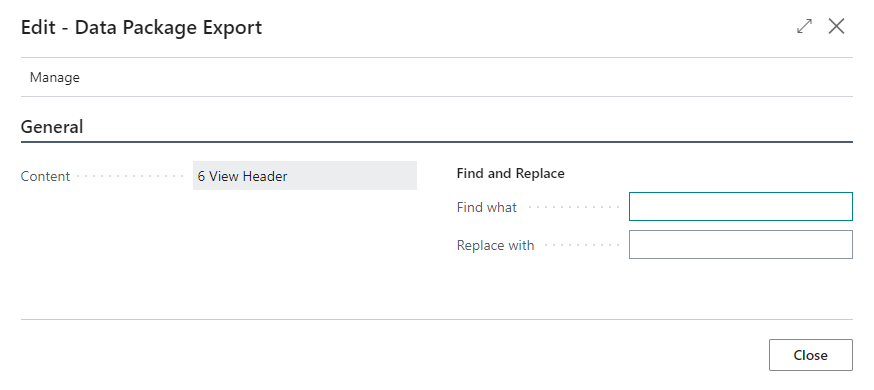
In the example, 10-0 can be replaced with Receipt-STD- to produce more descriptive names. The resulting output would be:
Receipt-STD-12|Receipt-STD-15|Receipt-STD-20|Receipt-STD-30|Receipt-STD-31|Receipt-STD-32
The export produces a single .zip file that always contains a .json file for each scan view.
Scan Sessions
The Scan Sessions page (searchable via Scan Sessions) provides an overview of all active scan sessions. The Exceptions field shows information about the last error.
To see detailed information about where an error occurred in the code, go to Start > Show Callstack. Please include this information when contacting the Helpdesk.