Authorization through OAuth 2.0
Before setting up any integration with the Boltrics Solution, OAuth2.0 authorization must be configured. This Learn page provides guidance for setting up OAuth2 authentication via Azure (including App Registrations and Client Secrets). Alternatively, you can set up OAuth2.0 through another service.
There are two authentication methods possible:
- Service-to-Service (Client Credentials) -- an integration runs as an application (no user)
- Use: For automated processes such as daily operations and automatic refreshing
- Requirements: 1) App registration in Microsoft Entra ID and 2) Registration of the Entra App in Business Central
- User Delegated (Authorization Code) -- an integration runs on behalf of a signed-in user
- Use: For user-initiated activities such as testing
- Requirements: 1) App registration in Microsoft Entra ID and 2) configuration of User Permissions in Business Central
In Microsoft Entra ID
Tip
Best Practice: Create a dedicated permission set for each type of authorization (user vs client credential) and for each integration.
Create the App
- Go to Microsoft Entra ID and open App registrations.
- Select New registration.
- Fill in:
- Name (e.g. MyIntegration)
- Supported account types (typically Single tenant)
- Redirect URI with Web as the platform (S2S requires a specific format; see the Microsoft Learn resource below)
- Click Register.
- Copy and store:
- Application (Client) ID
- Directory (Tenant) ID
Microsoft Learn Resources:
- General: How to register an app in Microsoft Entra ID - Microsoft identity platform | Microsoft Learn
- Service-to-Service: Using Service to Service Authentication - Business Central | Microsoft Learn
- Adding Redirect URI after registration: How to add a redirect URI to your application - Microsoft identity platform | Microsoft Learn
Next Steps per Authentication Type
Click the ▶ for your type of authentication of choice for the next steps and/or key information.
User Delegated (Authorization Code)
Add App Permissions
Go to API permissions and add Business Central permissions:
- Add Delegated permissions
- Permissions are enforced through the signed-in user
- Microsoft Learn Resource: Web API app registration and API permissions - Microsoft identity platform | Microsoft Learn
Next: open the User Delegated section under Business Central below.
Service-to-Service (Client Credentials)
Add App Permissions
Go to API permissions and add Business Central permissions.
- Add Application permissions
- Click Grant admin consent (required)
- Microsoft Learn Resource: Web API app registration and API permissions - Microsoft identity platform | Microsoft Learn
Create Credentials
For Client Credentials you need a credential:
- Certificates (recommended for production), or
- Client secret (easier for testing, higher risk)
Go to Certificates & secrets and add a certificate or create a client secret.
- Microsoft Learn Resource: Add and manage app credentials in Microsoft Entra ID - Microsoft identity platform | Microsoft Learn
Next: open the Service-to-Service section under Business Central below.
In Business Central
Click the ▶ for your type of authentication of choice for the next steps and/or key information.
User Delegated (Authorization Code)
❌ You do NOT register the app in Business Central
- Permissions are determined by:
- the user's BC license
- the user's permission sets
- For more information, read this Boltrics blog: Give your users access to the right actions using user permissions - Boltrics
Caution
- A limited user will typically NOT work for integration/API scenarios. If the user lacks rights, calls fail — even if the token is valid.
- Avoid overly broad rights; give the user only what is needed.
Service-to-Service (Client Credentials)
Why Business Central Needs an "Entra Application" Record
When using Client Credentials, Business Central receives an access token that represents an application identity (not a person). Because there is no user account to determine permissions from, Business Central needs an internal mapping:
Azure App Registration (Client ID) → Business Central permission sets
This mapping is the security boundary for integrations: without it, the app can authenticate in Entra ID, but Business Central won't know what it is allowed to do. The mapping is configured via Microsoft Entra Applications.
Step 1: Register the Application in Business Central
Note: Make sure you have set up a Redirect URI in your Microsoft Entra app.
|
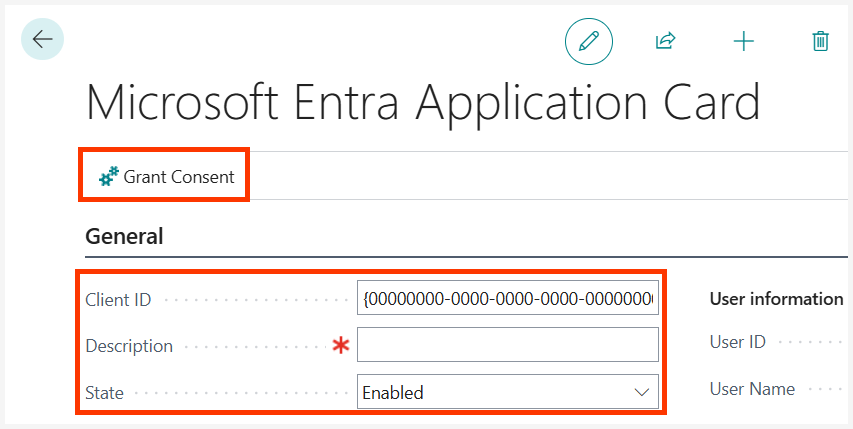
|
This creates the required link between Azure Entra ID and Business Central.
Step 2: Assign Permission Sets
After registration, assign permission sets that define what the integration may do.
Examples:
- Read/write specific WMS tables
- Execute specific Codeunits, including DIPost.
Customer Responsibility
The customer is responsible for:
- defining permission sets
- assigning them to the Entra application
- ongoing security review
Boltrics provides the integration platform; security configuration stays with the environment owner.
Caution
⛔ Do NOT assign Super permissions to a service-to-service application.
With SUPER, an integrated party can:
- read/modify/delete all data
- call any API endpoint
- access sensitive financial and operational information
If credentials are compromised, the impact is full environment exposure.
Tip
Principles of Least Privilege: Create a dedicated permission set per integration and only include:
- the required tables
- the required Codeunits
- the required API objects
This limits blast radius if credentials leak or misuse occurs.
Test Using Boltrics' Postman Collections
Once authentication has been set up, you can test if it works using Boltrics' Postman Collections. Find more information on the Boltrics Postman Collections Learn page.