Backorders
In this learn module, you'll discover how to use the backorder process in Boltrics. We'll walk through a real-life example from A to Z, demonstrating how an existing customer utilizes the backorder functionality. A step-by-step guide is provided to show you how to set up this process.
Step 1: Add the BACKORDER Condition
Start by adding the condition BACKORDER. This is a standard condition, if you have initialized the conditions it should already been there.
Step 2: Document Line Attributes with BACKORDER Condition
When an order is allocated but the items are not in stock, the order moves to an Allocation Shortage status (Status: 13-ALLOCATIONSHORT).
At this status, you can run a function set that marks the document lines with shortages using the BACKORDER condition. Below is the JSON string of the function set.
This function set adds the BACKORDER condition to all lines where the ordered quantity is not equal to the available quantity. This makes it easy to identify which lines have shortages.
Function Set JSON
{"FunctionSet":{"TableNo":11154660,"Entries":[{"EntryNo":"10000","CodeunitID":"11172846","FunctionCode":"REF","Parameters":[{"ParameterName":"TABLENO","Value":"11154661"},{"ParameterName":"FUNCTION SET","Value":"1278","ValueFunctionSet":{"FunctionSet":{"TableNo":11154661,"Entries":[{"EntryNo":"10000","CodeunitID":"11172846","FunctionCode":"SET CONDITION","Parameters":[{"ParameterName":"CONDITIONCODE","Value":"BACKORDER"},{"ParameterName":"CONDITIONVALUE","Value":"1"}]}]}}},{"ParameterName":"WHICH","Value":"*"},{"ParameterName":"FIELD 1","Value":"1"},{"ParameterName":"FILTER 1","Value":"2"},{"ParameterName":"FIELD 2","Value":"2"},{"ParameterName":"FILTER 2","ResultFunctionSetID":{"FunctionSet":{"TableNo":11154660,"DataType":"31488","Entries":[{"EntryNo":"10000","CodeunitID":"11172846","FunctionCode":"FIELD","Parameters":[{"ParameterName":"FIELDNO","Value":"2"}]}]}}},{"ParameterName":"FIELD 3"},{"ParameterName":"FILTER 3"},{"ParameterName":"CRIT. FUNCTION SET","Value":"1281","ValueFunctionSet":{"FunctionSet":{"TableNo":11154661,"DataType":"34047","Entries":[{"EntryNo":"10000","CodeunitID":"11172846","FunctionCode":"COMPARE","Parameters":[{"ParameterName":"VALUE1","DataType":"0","ResultFunctionSetID":{"FunctionSet":{"TableNo":11154661,"DataType":"31488","Entries":[{"EntryNo":"10000","CodeunitID":"11172846","FunctionCode":"FIELD","Parameters":[{"ParameterName":"FIELDNO","Value":"62"}]}]}}},{"ParameterName":"OPERATOR","Value":"<>"},{"ParameterName":"VALUE2","DataType":"0","ResultFunctionSetID":{"FunctionSet":{"TableNo":11154661,"DataType":"31488","Entries":[{"EntryNo":"10000","CodeunitID":"11172846","FunctionCode":"FIELD","Parameters":[{"ParameterName":"FIELDNO","Value":"107"}]}]}}}]}]}}}]}]}}
Step 3 (Optional): Set the Order to a Backorder Status
Optionally, you can create a dedicated backorder status.
For example, if part of the order can already be picked, you could split the order into:
- A Backorder
- A Regular Order
In this case, however, we leave the status as 13-ALLOCATIONSHORT for the entire order.
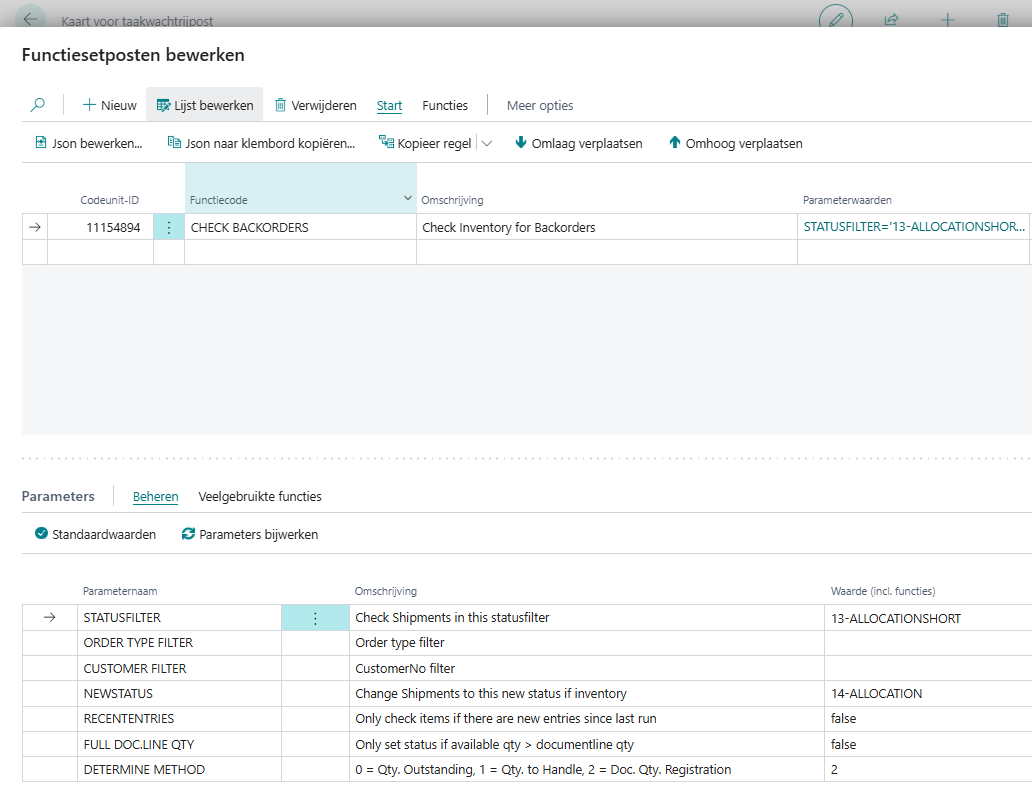
Step 4: Configure Job Queue – CHECK BACKORDERS
To automatically update backorders when stock becomes available, use the CHECK BACKORDERS job queue function.
This job queue entry checks allocation shortages with a specific filter (in this case, 13-ALLOCATIONSHORT) to see if there is now available stock for the lines with Qty. Registration.
If stock is available, the order status is updated to 14-ALLOCATION, which triggers a new allocation attempt.
Benefits of This Backorder Process
The main advantage of this method is that no manual action is required.
Orders with shortages are automatically processed by the job queue. The change in status determines whether there is still a shortage.
For example, if you create and allocate all orders at the beginning of the week, and additional stock arrives over the weekend, the orders with shortages are automatically updated and reprocessed — without anyone needing to be present in the office.