Masterdata Import
General
For Customer Items, Addresses and Locations a specific function is available, this function will be explained in this page. For other Masterdata Business Central offers Configuration Packages and the Edit in Excel function.
Preparation
Before importing the data it is important to prepare an Excel file with all relevant information. For all three types of Masterdata an Excel template is available. Open the 'Import Master Data - Cust. Items / Addresses / Locations' function. The page below will be shown.
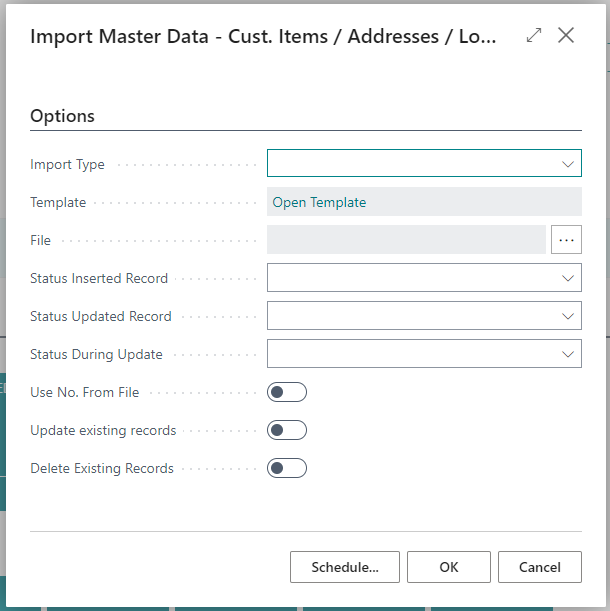
On this page you can select the type of Masterdata that needs to be imported in the field 'Import Type' and after that you can click on 'Open Template' to download the Excel template for that specific type of Masterdata
Important
Download template
You cannot change the template you have downloaded in terms of structure. Do not start copying and pasting columns to other columns, e.g. move column A to column F. Then the import will no longer work.
Below for each type of Masterdata an explanation of which field are important when populating the Excel template.
Customer Item template
The Customer Item template has multiple worksheets in it for different tables and Masterdata linked to the customer item:
- Customer Item: information directly linked to the customer item card/table.
- Unit of Measure: information about the unit(s) of measure that is/are relevant for the customer item.
- Carrier Type: this is linked to the standard handling unit type(s) and quantitie(s) on a handling unit that are used.
- Condition: this can be used to set up conditions on a customer item.
- Pick Location: when picking is done for a customer item, via this way the settings for the related location can be set up.
- Tax Data: this can be used when dealing with customs.
When population the Customer Item template at least the worksheets 'Customer Item' and 'Unit of Measure' should be populated. Use of the other tabs depend on how the process is set up.
In the 'Customer Item' worksheet make sure to populate the following fields:
- Customer Item No.: when editing existion customer items this should be the current customer item no. form the system. When adding new records this should be a unique code. When importing you can choose whether you want to use this code or let the system create the code based on the No. Series set up for customer items.
- Description: description for the customer item.
- Base Unit of Measure: this is the base unit of measure for this customer item. Make sure that the Units of Measere used already exist in the system.
- Customer No.: populate this field with the customer number where the customer item should be linked to.
For each customer item in the list the worksheet 'Unit of Measure' should be populated as well. The following fields are important:
- Customer No.: this value should match the record(s) in the customer item worksheet.
- Customer Item No.: this value should match the record(s) in the customer item worksheet.
- Unit of Measure Code: this value should at least match the record(s) in the customer item worksheet based on the Base Unit of Measure field. Next to that it is possible to add multiple records per customer item.
- Qty. per Unit of Measure: this is the quantity per unit of measure. For the Base Unit of Measure this value should always be 1. For all extra Units of Measure the value depends on the relation in quantity to the Base Unit of Measure. For example: for Base Unit of Measure 'PCS' it could be possible to add Unit of Measure 'BOX'. If this 'BOX' contains 10 PCS the value for this field should be 10.
All other fields and worksheets are optional and depend on the set up.
Address template
The Address template has multiple worksheets in it for different tables and Masterdata linked to the address:
- Address: this worksheet is for all general address information.
- Time Slot: to register opening times or time slots for the address.
- Condition: in this worksheet it is possible to link one or more conditions to the address.
- Mapping: here it is possible to link an address for a customer and/or vendor based on the code the customer/vendor uses.
- Cust.Vend. Addr. Setup: more information will follow.
- Cust.Vend. Addr. Details: more information will follow.
- Cust. Item Addr. Setup: set up can be done here for specific address - customer item combinations.
- Cust. Item Addr. Conditions: for the above combinations it is possible to set up conditions here.
- Party: more information will follow.
- TMS Assigned Restriction: more information will follow.
- Pallet Pool Setup: more information will follow.
- Pallet Pool Org. Link: more information will follow.
- Cust.Vend. Addr. Conditions: more information will follow.
- Tax Permits: this part applies to customs settion specifically for the address.
When population the Address template at least the worksheet 'Address' should be populated. Use of the other tabs depend on how the process is set up.
In the 'Address' worksheet make sure to populate the following fields:
- Address No.: here the address number or code can be populated. When importing you can choose to use this number or to use the No. Series that are set up for addresses. The Address No. has to be unique. When using other numbers than the No. Series make sure they don't overlap
- Name: this is the name of the address.
- Address: the actual address.
- City: the city for the address.
- Post Code: the post code for the address.
- Country/Region Code: the country/region for the address.
Addresses are frequently used as Sender and/or Ship-to address. To indicate where the address can be used the columns 'Sender Address' and/or 'Ship-to Address' should be set to 'true'.
Condition Template template
The Condition Template template has two worksheets:
- Condition Template: the template header — Code, Description and Behavior.
- Condition: the conditions and values linked to each template.
In the 'Condition Template' worksheet make sure to populate the following fields:
- Template Code: a unique code for the template. When importing existing templates, use the current Code.
- Description: description for the template.
- Behavior: how the template is applied to a record —
MergeorOnly Template. See Condition Templates for what each option does.
In the 'Condition' worksheet, populate one row per condition:
- Template Code: must match a Code in the 'Condition Template' worksheet.
- Condition Code: the condition to set.
- Condition Value: the value for the condition.
This import type is intended for bulk-creating many templates at once, for example one template per loading code. See Condition Templates for how templates are used once imported.
Location template
The Location template only has one worksheet. You can find more details about locations on the locations page or check the tooltips on the location card.
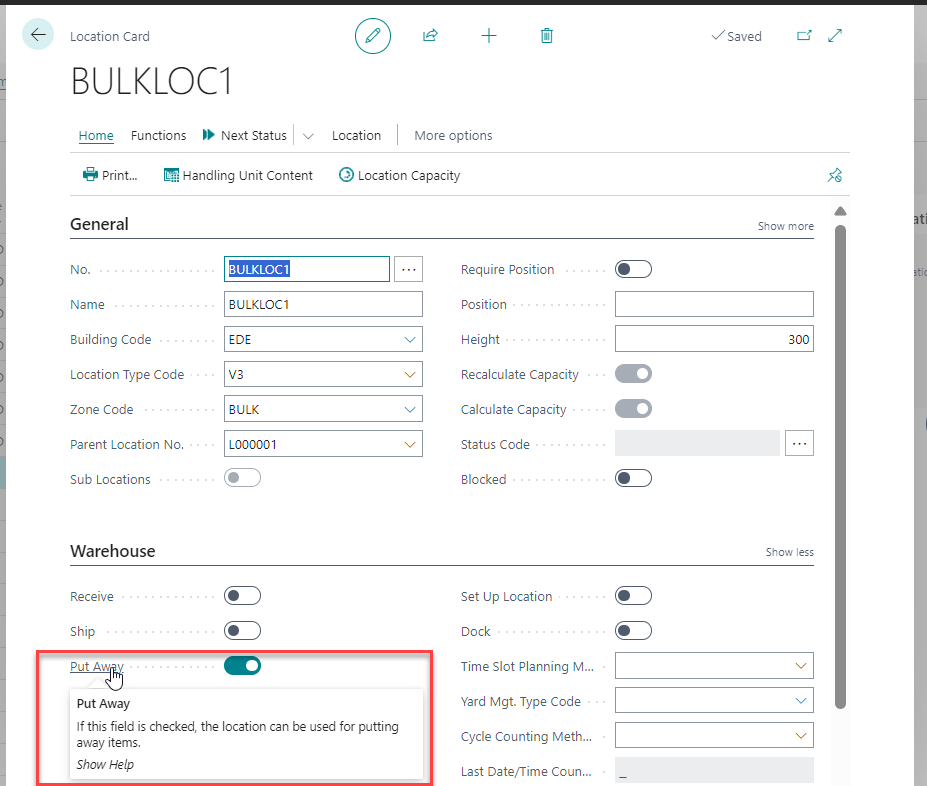
When populating the Location template at least populate the following fields:
- Location No.
- Building Code
- Name
- Parent Location No.
- Location Type Code
- Zone Code
Also set the one or more of the following fields to true based on where the location can be used for:
- Receive
- Ship
- Put Away
- Pick
- Trip
- Production
- Set Up Location
- Dock
Importing Data
After populating the desired template you can start importing the data. Below you can see which options and checkboxes you have when importing master data.
Important
Download template
You cannot change the template you have downloaded in terms of structure. Do not start copying and pasting columns to other columns, e.g. move column A to column F. Then the import will no longer work.
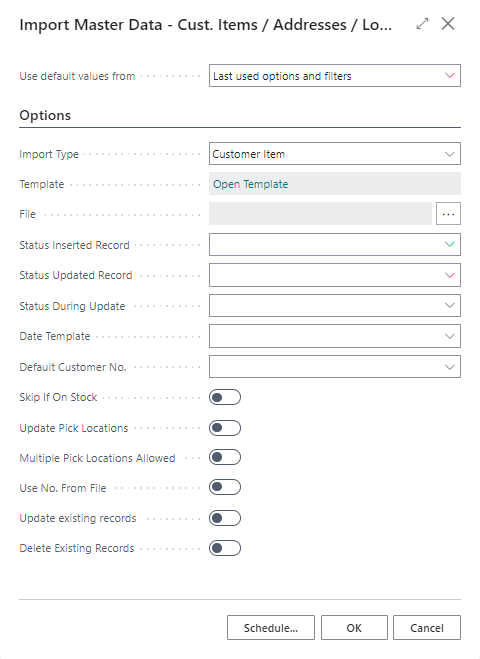
- Import type: choose an import type: Customer Item, Address, Location or Condition Template.
- Template: download the template from the import type you choose.
- File: upload the file from your computer.
- Status inserted/Updated Record: you can define different status processes for Customer Items, Addresses or Locations. After insert or update a record you can set a chosen status.
- Status during update: if you upload a very large file, you can choose to temporarily give the records a different status, e.g. pending.
- Date Template (only for Customer Items): here you can apply a data template to the data you are importing. For example, that you only upload article number and the description but that the rest of the information is completed with a standard template.
- Default Customer No. (only for Customer Items): here you can set a default customer for all customer items that will be imported.
- Skip if on Stock (only for Customer Items): when you upload Customer Items that are already in stock it skips them.
- Update Pick Locations (only for Customer Items): if this is checked, the pick locations on the customer item will be updated.
- Multiple Pick Location Allowed (only for Customer Items): if this is checked, the multiple pick locations on the customer item are allowed.
- Use No. From File: if this is checked, the system grabs the number from the excel worksheet.
- Update Existing Records: this option allows you to update existing records with new data.
- Delete Existing Records: see notice below!
Important
If this is checked, the system removes all records that are not in the excel file
When the options are set you can click on 'OK' to start the import. When the import is finished a summary will be shown. You can see the result of you import in the table for the master data you imported.
Important
Importing Data
When importing new data first test your import in the RAPP environment, you can check if everything is coming through as expected and you can do tests based on that data. Once you are sure that the data import is correct you can import the same populated template in the PROD environment.