Boltrics Print Service
Introduction
The Boltrics print service is a powerful service that can help streamline your printing and communication processes like never before. By installing this service on a local server within your network, you'll gain access to a range of benefits that will help your business operate more efficiently and effectively. One of the key advantages of the print service is that it doesn't require any open incoming ports in your firewall. This means you can use it to print and communicate with printers, scale devices, and SQL databases without having to worry about security issues. Additionally, the print service can retrieve the installed printers directly from Business Central, eliminating the need for time-consuming manual configuration.
With the print service, ZPLs are no longer sent directly to the printer. Instead, they are processed through the standard print queue that is visible in Windows. This ensures that your printing process is more reliable and efficient. And with the printing order managed through a queue in Business Central, you'll be able to prioritize your print jobs more easily than ever before.
Finally, the print service also makes it possible to establish SQL connections with local SQL databases. This feature can be a game-changer for businesses that rely heavily on data analytics and reporting.
In short, if you're looking for a powerful and flexible solution to help improve your printing and communication processes, the print service is the way to go. Below, you'll find more information about the setup process.
Boltrics print service infrastructure
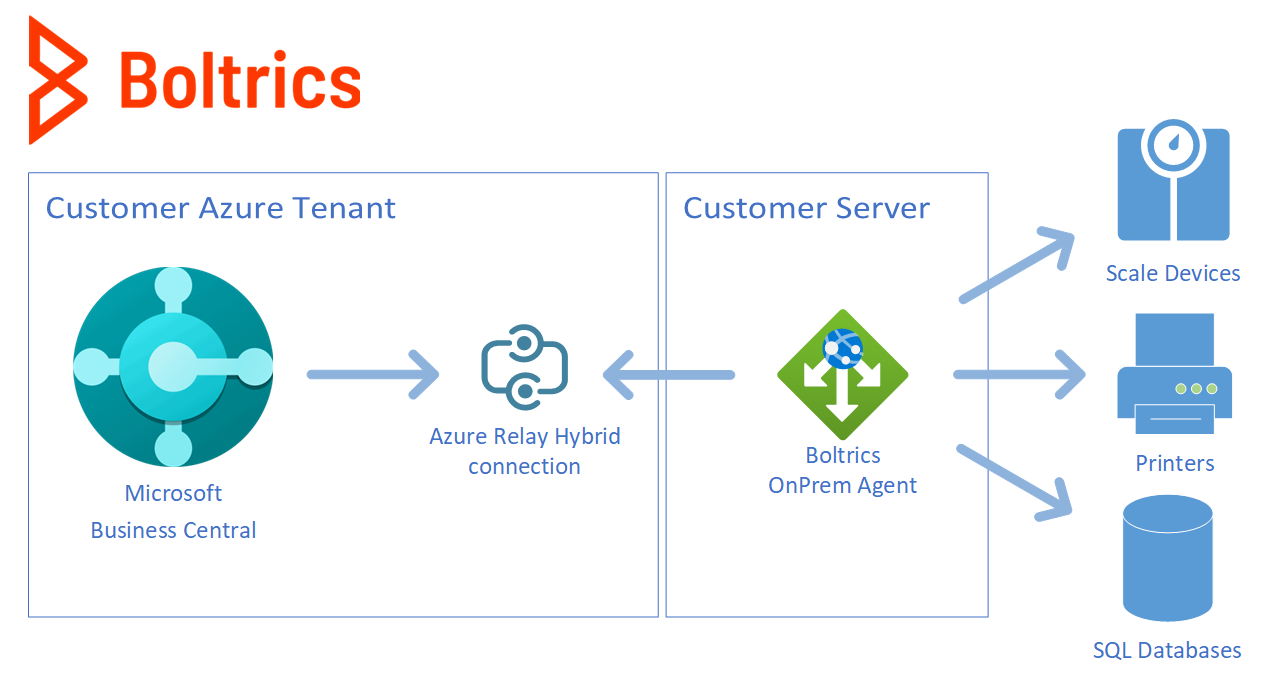
Minimum Hardware Requirements
- Windows server 2012 or later
- Internet connection
- There are no additional CPU/RAM requirements, this can be very simple.
Minimum Software Requirements
- Powershell 5.1
- .NET Runtime 8
Technical Installation
The installation of the print service
Important
- Run Powershell as Administrator
This PowerShell script installs the latest available version of print service
[System.Net.ServicePointManager]::SecurityProtocol = [Net.SecurityProtocolType]::Tls12
$Url = "https://bpbcdownloads.blob.core.windows.net/software/PowerShellScripts/Install-OnPremAgent.ps1"
Invoke-Expression "$(Invoke-WebRequest -Uri $Url -UseBasicParsing)"
During the script execution, you will encounter several prompts:
- You will be asked whether you want to install (clean install), upgrade (only the service itself will be updated), or delete the service.
- You will receive a prompt regarding the connection type. The options are Hybrid Connection (Azure Relay) or Kestrel (direct connection). Azure Relay is used for Microsoft Cloud and Boltrics Cloud environments, while Kestrel is used for On-Premise environments.
- You will be prompted about updating .NET Core. Please be aware that updating .NET may cause .NET-dependent applications to crash or produce errors.
Note
You will need a Connection String to be able to complete the setup. You will receive the connection string after the initial setup of the Business Central installation.
Update
You can use the installation script
Actual setup when Technical installation is executed
Configuring an agent
First we need to configure the print service. Within Business central search for "OnPrem Agents".
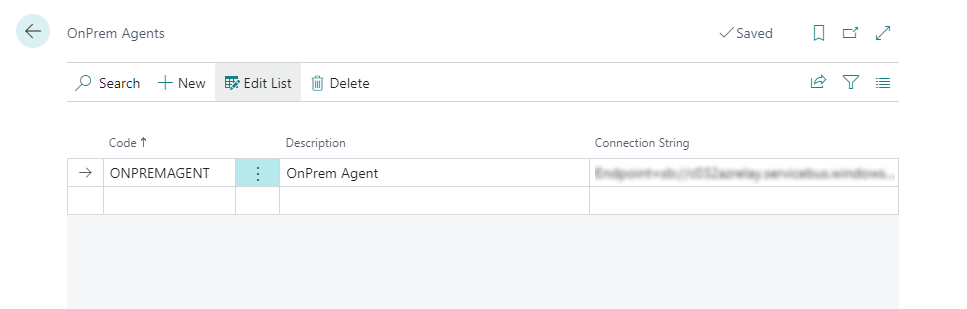
The Code and Description fields can be filled with any values that suit your needs, as long as the Code field remains unique. The Connection String field should resemble a connection string to either an Azure Relay or the service, depending on whether a direct connection is set up. If an Azure Relay is used, Boltrics will provide or fill in the connection string.
If you are using the Azure Relay, you must also fill in the Storage Account field.
Configuring printers
To configure a print server open the view "Print Servers"
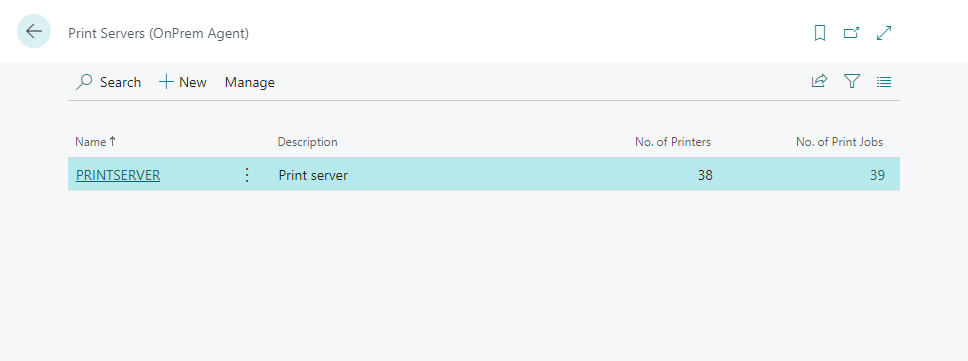
Click on the "New"-button. This will open up the card page for the new print server:
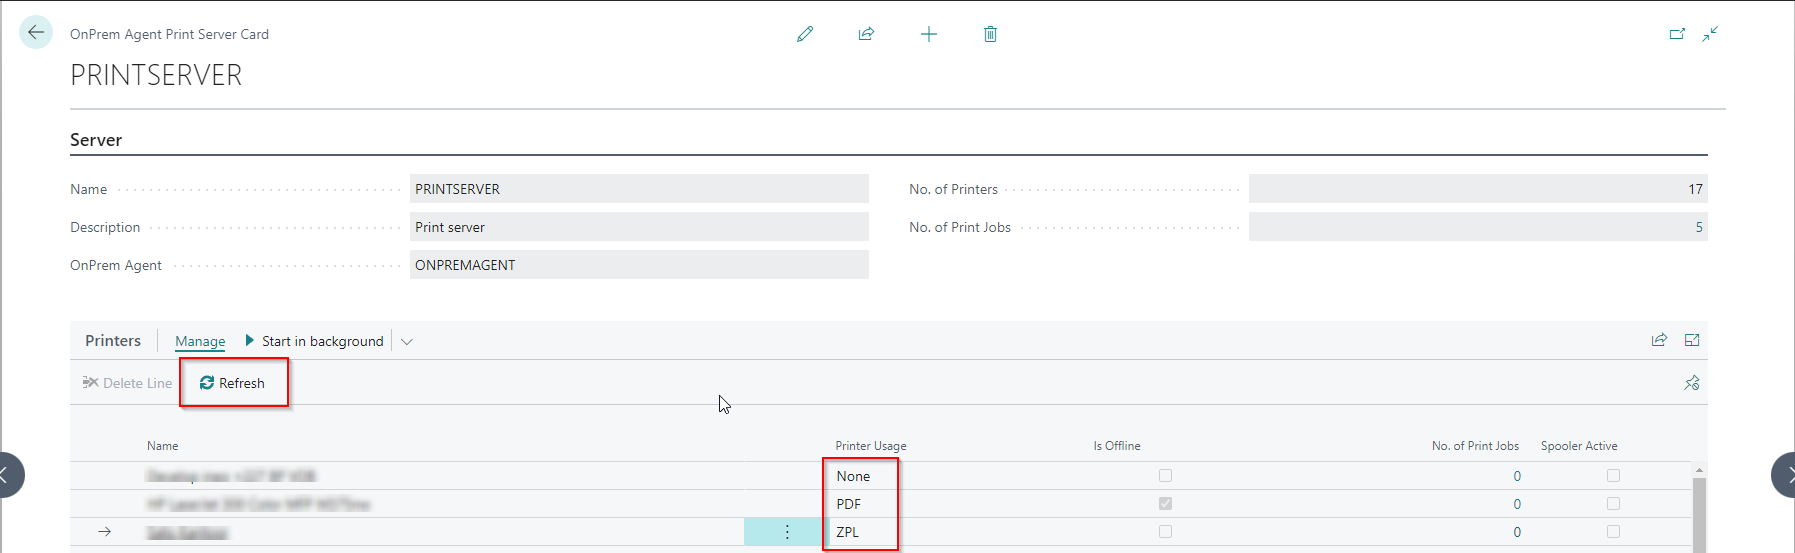
- Fill in a name. Be aware this name will be added to the printer name in "User Printer Selection" later on so maybe keep it short.
- Fill in a convenient description.
- Select the onprem agent from the dropdown. Probably the agent created in the previous paragraph.
- Click on the refresh button. This might take a minute. The service on the local server is queried for the printer installed on that machine.
- In the list created select the appropriate "Printer Usage". When "None", the default option, is selected the printer can not be selected in "User Printer Selection". For ordinary printing choose the option "PDF". For ZPL label printing select "ZPL" as option for that printer.
Configuring User Printer Selection
In "User Printer Selection" the options for a printer should be setup like a printer using the boltrics print service, but select the printer name from the dropdown. This is also how to setup a ZPL printer. Type should be Web-Service, and maybe fill in the Code if this were used before. This is setup this way to make migration from the Boltrics (Print) Service as convenient as possible.
Scale setup
Open the view "Indicator List":

Creating a new line would take some testing on the settings. For this to work with the onprem agent two fields need to be set correctly. "Communication Protocol" should be set to the option "OnPrem Agent". "Boltrics Service URL" should be filled with the value in the Code field of the OnPrem Agent.
Timeout on Fortigate firewalls
The default value for terminating a TCP session without data (also known as the idle timeout) on a FortiGate firewall is 3600 seconds (1 hour). This means that if no data is sent or received within this period in a TCP session, the session will automatically be terminated by the FortiGate. The current setting of this value can be found via the CLI with the following command:
get system session-ttl
It can be modified using the following commands:
config system session-ttl
set default never
end
The parameter is also available on policies:
config firewall policy
    edit <policy-id>
        set session-ttl never
    next
end
Security Considerations
The print service works by acting as a bridge between Business Central (in the cloud) and the local resources inside of or accessible from your network, such as printers, SFTP servers, SQL databases, and files. Traffic that is meant for your local network travels through a secure relay (the Azure Hybrid Connection) and is picked up by the Print Service that runs on the server in your network.
Because all of this traffic passes through a single point, that point must be well protected. If someone who is not authorized gains access to the relay or to the server that hosts the Print Service, they can position themselves in the middle of this communication and intercept traffic that was intended for the print service.
What could go wrong
When an attacker manages to intercept this traffic, they could gain access to sensitive information, for example:
- Print jobs – the documents and labels that are being sent to your printers.
- Credentials – the usernames and passwords used to connect to your SFTP and SQL servers.
- Files and other requests – any files and other requests that Business Central sends to local resources inside your network.
In short, everything that Business Central sends to your local network could be read by an unauthorized person.
This kind of interception is difficult to hide. When an attacker intercepts a request, that request no longer arrives at its intended destination. As a result, printers stop printing, connections fail, and processes break down. These visible problems make it likely that the interception will be discovered.
However, by the time you notice these disruptions, sensitive information may already have been exposed. Detection is therefore not a substitute for prevention.
How to protect yourself
The most important safeguard is simple: strictly limit who and what can reach the server that hosts the print service. In practice this means:
- Only allow trusted administrators to log in to the server.
- Make sure the server is fully up to date with security updates.
- Do not use the server for other, unrelated tasks that could introduce risks.
- Restrict network access to the server so that only the systems that genuinely need it can connect.
By keeping this server locked down, you make it very hard for an attacker to reach the relay or relay credentials and intercept your traffic, which protects the sensitive information that flows through the print service.