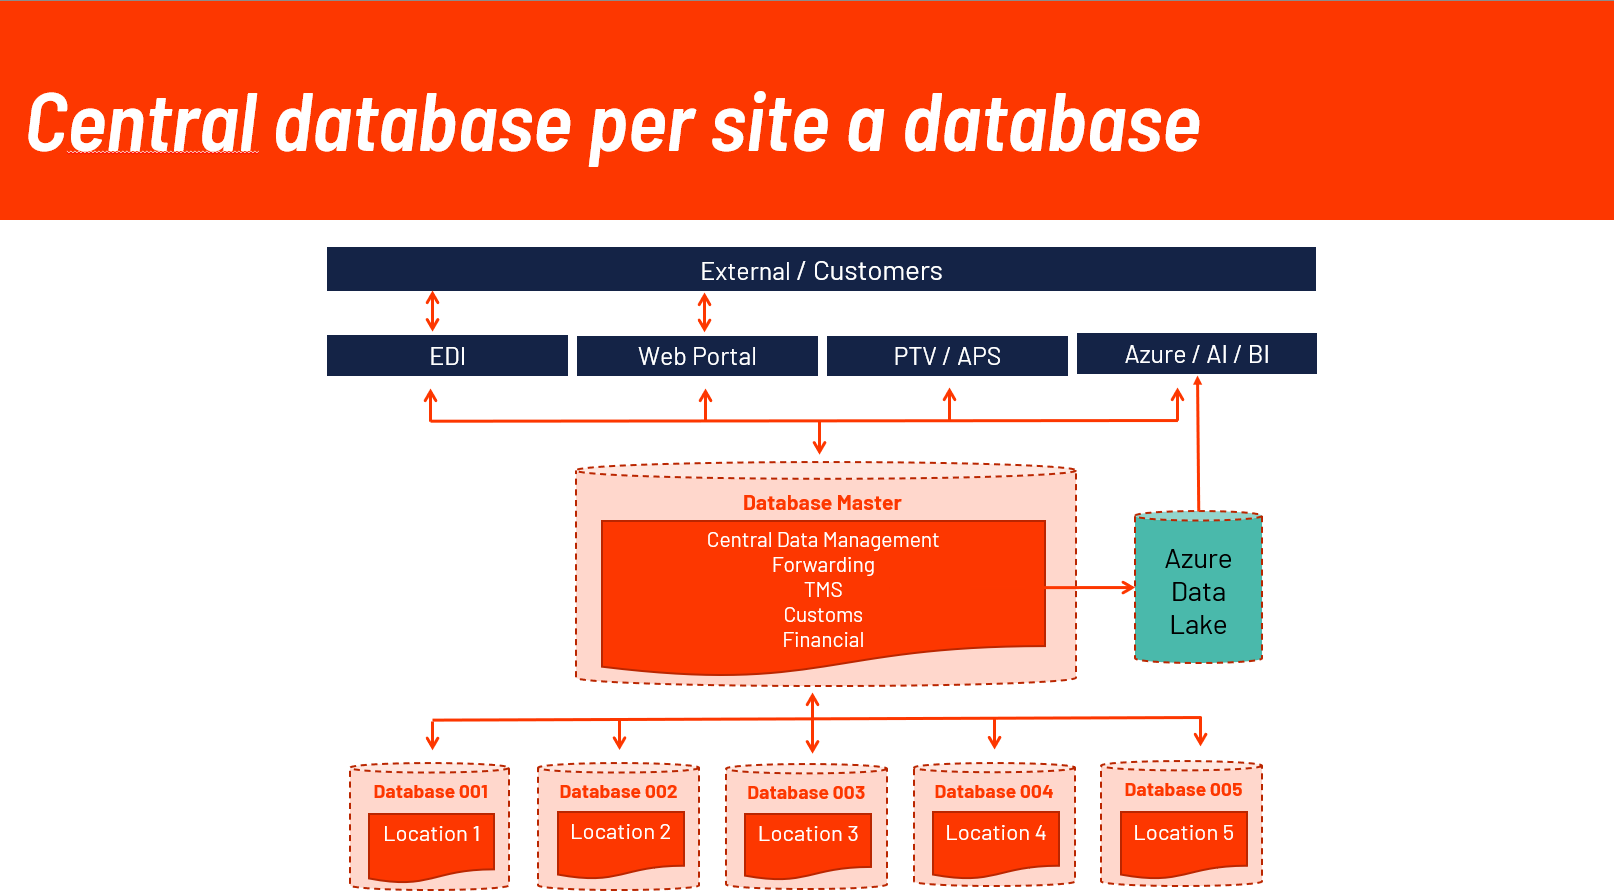
Central Layer
The Central Layer provides significant business value by enabling seamless synchronization and sharing of Master Data across multiple companies or administrations. This ensures consistency and accuracy of core information—such as customer, vendor, item, and pricing data—no matter where it is created or updated in the organization.
Key business benefits include:
- Data Consistency: By keeping master data aligned across all administrations, the Central Layer reduces errors, redundant records, and confusion that may arise from outdated or mismatched information.
- Operational Efficiency: Updates performed centrally are automatically distributed to all relevant companies, eliminating the need for repetitive manual data entry and saving considerable administrative effort.
- Faster Decision Making: Reliable and harmonized data enables managers at both central and local levels to make informed decisions, based on the latest available information.
- Scalability: As organizations grow and add new legal entities or operational units, the Central Layer simplifies onboarding by rapidly extending master data synchronization with minimal setup.
- Auditability and Compliance: Maintaining one source of truth for master data supports audit trails and helps companies meet compliance requirements by reducing discrepancies and ensuring data integrity.
- Reduction in Integration Costs: The Central Layer replaces complex, custom-built interfaces between companies with a standardized mechanism, helping organizations cut integration and maintenance costs in the long run.
In summary, the Central Layer empowers organizations to operate as a unified whole, while enabling flexibility and autonomy where needed—driving both efficiency and improved data governance.
Best Practises
- Harmonize master data (eg same pallettypes, locationtypes)
- Use the same unique IDs per entity, e.g. customers, vendors, addresses.
- Assign responsible owners for managing master data.
- Define clear procedures for adding missing master data, including outside working hours.
- Put TMS or FMS in one database.
- Use Fabric for BI Reporting
Key Considerations
- Determine whether consolidated invoicing across multiple sites is required. If so, clearly define which VAT number and legal entity name should appear on the invoice.
- Assess the level of operational interaction between sites. Group sites for Central Layer purposes only if the interaction exceeds 20% to ensure efficiency and relevance.
- It is generally recommended to implement a Central Layer for each region (e.g., by country). Consider whether there is a business requirement to synchronize data across regions as well.
- Evaluate whether transactional data (such as orders) also needs to be synchronized through the Central Layer, in addition to master data.
Tip
Make sure you are aware of the considerations when using Multiple warehouses in one administration.
How to
1. Define C/L Partners
C/L Partners are the parties that exchange data with each other.
- Define the
CENTRAL/CLcode for the central company where changes will be applied. - Set other codes for all companies to be served from the central company.
- Transport location: DIPost web service or HTTPS Endpoint
**. - For each administration, set up an endpoint and fill in the endpoint details.
- Base URL: customer PROD URL
**. - Company ID: retrieve from the
IDfield on the Companies page. - Building code is only used for WMS transactions, WMS documents, and stock exchange through Central Layer.
2. Define C/L Entities
C/L Entities define which tables are exchanged between partners.
- Use the Initialize function to set the default table selection.
- Entities are blocked by default when created and therefore not activated by default.
- In Table filter you can optionally specify a filter.
- Data transfer: specification of all data recipients from the central company.
- C/L Entity Fields: use to exclude fields, or to set a default value in decentral companies.
- Send all records: option to send all records in a table to a party once.
3. Data integration settings
- Central Layer Partner Id: determines which administration belongs to which partner. The Partner Id field is the ID of the current administration — make sure not to mix these fields up.
- Tip: if you want to change decentralized data without changing the table configuration, temporarily clear this field.
4. Activate Message types in each company
SND-CDM-RECORDin the central company andRCV-CDM-RECORDin the decentral company are used to communicate changes.
Tip
In the message type, specify a filter using a Parameter string so that the C/L exchange runs at a lower priority.
5. Activate Job Queue 18
If not already activated for other integrations, activate Job Queue 18.
- All messages are handled through job queue function 18.
- You can specify a filter using a Parameter string so that the C/L exchange runs at a lower priority.
Warning
In C/L Entities, an entire table can be harmonized with decentral companies using Data Transfer → Send All Records. This will create a lot of messages: one message for each record to each partner at once!
Important notices
- Master data must be harmonized before activating Central Layer (for example: same customers, units, and items).
- Tip: use Export Content to compare master tables, for example with Beyond Compare.
- Data harmonization is the responsibility of the customer.
Central partner
Create an HTTP endpoint for each connection
In the HTTP Endpoint table, an endpoint must be created and configured for each decentral company + environment combination (PROD, RAPP, WISH, ZERO).
HTTP endpoint setup (field explanation)
- URI: DIPost web service URL such as
https://api.businesscentral.dynamics.com.... This URL must also have an entry in 3PL App Platform Registrations. Open the Web Service page and look up the SOAP URL from DIPost. - AAD App code:
- Fill out the code and App ID provided by the customer's IT admin.
- Set the tenant ID.
- Specify the single-tenant account type.
- Add the secret with an expiration date.
- OAuth Authorization:
ClientCredentials. - Tenant ID: see the GUID in the login link.
- AAD App Scopes:
https://api.businesscentral.dynamics.com/.default. - The user permission set
3PL DATAHUBSUPERcan be used to grant the required permissions.
Decentral partner
- In Azure Active Directory Applications, the Azure App Client ID must be enabled and consented by the IT admin.
- The user permission set
3PL DATAHUBSUPERcan be used to grant the required permissions.