ExactOnline Financial Sales Integration Configuration Guide
Overview
This document describes how to configure the ExactOnline financial integration in Boltrics, including account setup, message types, and triggering conditions. Use this as a reference when you implement or audit your ExactOnline financial integration flows.
Prerequisites
- Access to Boltrics system with financial integration configuration permissions
- Understanding of financial data structures and account concepts
- Access to DataHub for flow management
- ExactOnline account with appropriate permissions
- Active DataHub EDI subscription
Step-by-Step Configuration Process
1. Preparation
Before you start integrating your finance with ExactOnline there are some prerequisites:
Key Requirements:
- The general ledger account numbers you wish to use must be the same in both applications
- Your Debtor- or Creditor numbers should be the same in both applications. You can also choose to add Alternative Number to Customer or Vendor card for this purpose
- Please prevent non-numeric characters in your Document numbers. This will greatly enhance the traceability of documents
- Make sure you have a user account available that has access to the target system and associated administrations
📚 Important: Currently, only one ExactOnline environment can be connected per 3PL Dynamics environment. While you can send data from multiple administrations to ExactOnline, all data will be directed to the same ExactOnline environment and administration.
It is possible to set up a separate creditworthiness check so that verification can be performed in the logistic process to determine whether the order should be processed. Another e-learning is available for this purpose.
2. Account Numbers Configuration
To ensure your financial applications are properly aligned, the correct account numbers must be configured in 3PL Dynamics. For more detailed information about this configuration, you can review this page: https://learn.boltrics.com/appBase/ServiceWMS.html
The account numbers for debtors or creditors can be found under the Customer Posting Groups or Vendor Posting Groups.
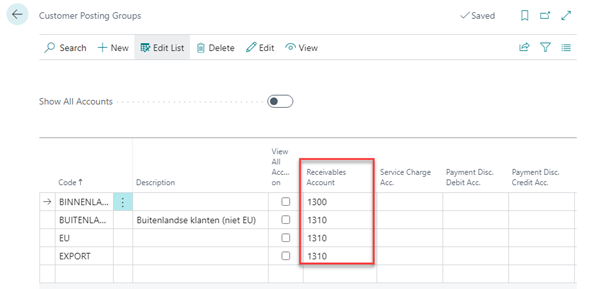
Implementation:
- Change the Receivables account if it differs from the standard of 3PL Dynamics
- Ensure account numbers match between 3PL Dynamics and ExactOnline
- Verify Customer Posting Groups and Vendor Posting Groups are correctly configured
3. Tax Posting Setup
Finally, but not least important, you must ensure your VAT details are synchronized correctly. To do this, please go to the Tax Posting Setup and make sure your Tax Identifier matches the Tax Identifier in the target administration.
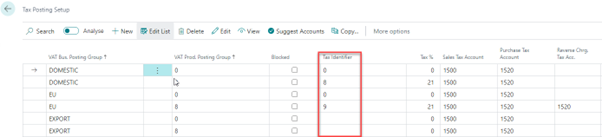
Configuration Steps:
- Navigate to Tax Posting Setup
- Verify Tax Identifier matches between systems
- Ensure VAT rates are synchronized
- Test VAT calculations in both systems
4. ExactOnline App Registration
This step must be performed to register an application within ExactOnline so that the DataHub can communicate with your ExactOnline environment.
Step 4.1: Verify User Permissions
First, you need to check if you have sufficient rights to register the application.
Access ExactOnline:
- Go to https://start.exactonline.nl
- Log in with your account
Navigate to Master Data:
- Go to Master Data
- Click on "Roles"
- If "Roles" is not visible, you have insufficient rights. Contact your ExactOnline application administrator, who should preferably perform the remaining steps.
Check Subscription Management Rights:
- Look for "Subscription Management" and click on the number to the right of this text
- Verify that your username appears on the right side
- If your username is not listed, you have insufficient rights. Contact your ExactOnline application administrator, who should preferably perform the remaining steps.
Record Required Information:
- Note down the ExactOnlineDivisionID and ExactOnlineJournalID that you will need in step 6
Step 4.2: Create Application Registration
Access App Management:
- Go to https://apps.exactonline.com
- Choose your country
- Click "Sign In"
Navigate to App Management:
- A user with the "Subscription Management" role will see "Manage My Apps" in the red banner at the top
- Click "Manage My Apps"
Register New Application:
- Click "Register an App"
- Give the app a name, such as "DataHub"
- Enter the redirect URI: "https://dh.azure-api.net/dh2nl/Authorize"
- Check and accept the terms and conditions via the two checkboxes
- Click "Register"
Save Application Credentials:
- The Client ID, Client Secret, and Redirect URI will appear
- Save the data for "Client ID", "Redirect URI", and "Client Secret" for step 6
- Store the Client Secret securely; it is essentially part of a password
- The Subscription Management rights within ExactOnline were only needed for the registration of the ExactOnline app. Any user - with or without subscription management rights - can use the registered app.
5. Marketplace Configuration (Installing Exact Online Interface in Boltrics 3pl Dynamics)
There are two marketplace items available for this setup:
- Exact Online Financial - Complete integration setup
- Exact Online Refresh Token - Token refresh functionality
Installation Process
Step 1: Install ExactOnline Financial The ExactOnline Financial marketplace item will configure the DataHub and Boltrics 3PL Dynamics completely. During installation, you will be prompted to enter:
- ExactOnlineClientId (obtained in previous step)
- ExactOnlineClientSecret (obtained in previous step)
- OnlineDivisionID (found in your ExactOnline environment)
- OnlineJournalID (found in your ExactOnline environment)
📚 Important: After installation, you can still adjust your OnlineDivisionID and OnlineJournalID parameter on the message type under the 'Webrequest Headers' tab. If you want to send to a second administration from the same company, please contact our support team.
Step 2: Complete Authentication After installation, step 2 (authentication) is automatically activated and you will be prompted to log in to ExactOnline. This will activate the connection between the DataHub and ExactOnline. When finished, the integration is complete.
⚠️ Note: Please be aware that you may receive one or two errors involving authentication from the DataHub. This is normal and after approximately 15 minutes you should not receive them anymore. If you do receive them, please contact support.
Token Refresh
ExactOnline RefreshToken Sometimes the authentication to your ExactOnline environment is deactivated or expired due to the authentication mechanism of ExactOnline. If this is the case and you encounter error messages, you can restore the connection via the marketplace item "ExactOnline RefreshToken". After this, you can restart any unsent invoices from the DataHub. For more information, see: DataHubErrorAnalysis.md
6. Invoice Processing and Monitoring
Once the integration is configured, invoices will be automatically processed and sent to ExactOnline.
Invoice Flow Process
When an invoice is posted in Boltrics 3PL Dynamics, it will appear in the message type SND-POSTSALESINV-EX. The invoice is then sent to the DataHub through the jobtask queue. In the DataHub, you can find the transaction in the flow "Generic Send Sales Invoice to ExactOnline NL".
Monitoring and Troubleshooting
For background information and troubleshooting, refer to:
- DataIntegrationDocumentLinks.md - Information about document links and attachments in data integration messages
- DataHubErrorAnalysis.md - Comprehensive guide for analyzing and resolving DataHub errors
Transaction Status
You can monitor the status of your invoice transactions by:
- DataHub Flow List: View all configured flows and their transaction counts
- Transaction Details: Click on transaction numbers to see detailed processing information
- Error Analysis: Use the error analysis guide to troubleshoot any issues
- Restart Transactions: Restart failed transactions after resolving underlying problems
Support Resources
- DataHub Error Analysis: Error Analysis Guide
- DataHub Transactions: Transaction Management
- Data Integration Document Links: Document Links Guide
- Boltrics Academy: Q&A Sessions
- Support Contact: Support Documentation
Summary
Complete the following checklist to ensure successful integration:
- ✅ System Preparation: Account numbers and debtor/creditor numbers aligned
- ✅ Account Configuration: Customer/Vendor Posting Groups properly set up
- ✅ Tax Setup: VAT synchronization verified between systems
- ✅ ExactOnline App: Application registered with proper credentials
- ✅ Marketplace: Integration installed and authenticated
- ✅ Invoice Processing: Automatic invoice flow configured and tested
- ✅ Monitoring: Transaction monitoring and error handling set up