Excel Import Trip
General
The Excel Import File functionality offers the option of importing data from an Excel-file into 3PL Dynamics. On this page the functionality is described related the import and creation of Trips
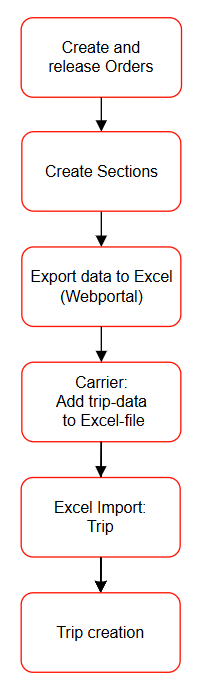
The Excel Trips is part of a the following process:
Note
- The Market Place APP: TMS Basic Setup contains an example of the Excel Import Format List: TMS TRIP.
- To export data with the unplanned sections a page can be created in the 3PL Dynamics WebPortal. This page must be configured with the same columns as the Excel template.
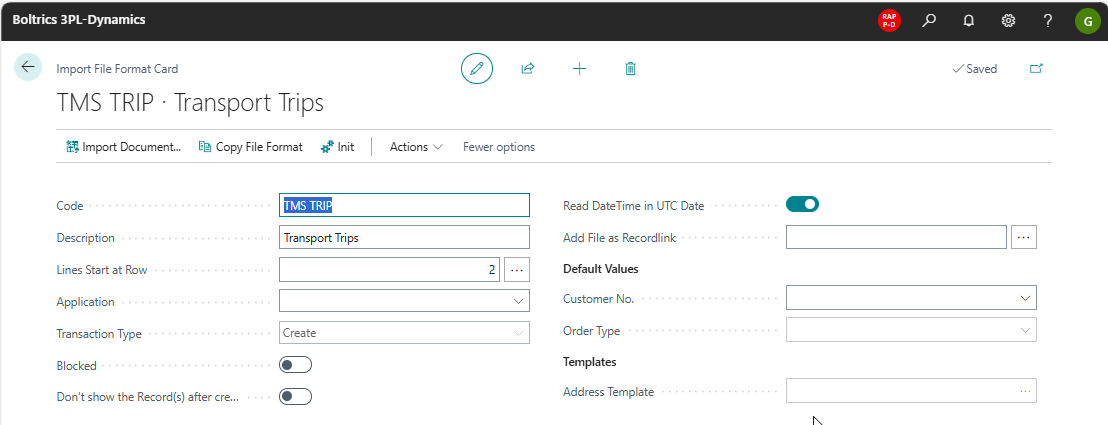
- When testing the first import check the dates/times imported. Local user setting on Excel are applicable so the value on the field: Read Date Time in UTC Date on the page: Import File format Card: TMS Trip may have to be changed.
Functionality
On the page: Excel Import File Format List the import format: TMS Trip can be created to import and create Trips.
Tab: General
This tab contains the general information on the Excel Import Format.
Actions
Import Document: Starts the wizard to import orders from an Excel file.Copy File Format: Creates a copy of the current selected record.Init: Initializes fields on the tabs: Fields (Header) and Fields(Lines) based on the field: Document Types.Actions: Opens the menu: ActionsNew Document: -Init Forwarding: Initializes fields on the tabs: (Header) and Fields(Lines) for the Forwarding documentsImport Forwarding: Imports a forwarding Excel file.Init Field Mapping from File: Can be used to automatically match column headers with imported fields
Fields
Code: An unique code for the Excel Import Format.Description: A text which describes the Excel Import Format.Line start at row: Must contain the line number on which the order data is recorded in the Excel file.Application: must be empty.Transaction Type: Fixed value: CreateBlocked: Check if the Excel Import Format is no longer valid.Don't show Records after Creation: Options: True and False. True will not open a page containing created recordsRead DateTime in UTC Date: When working with carriers/users in multiple time-zones it is adviced to work in UTC-date/time-format.Add Files as Recordlink: When the Order is created a copy of the Excel file is added as a document link.Customer No: Not applicable on the Excel Import TripOrder type: Can be filled if all Trips have the same order type.Document Type (TMS): Must be emtpy.Processing Type: Fixed value: Create.
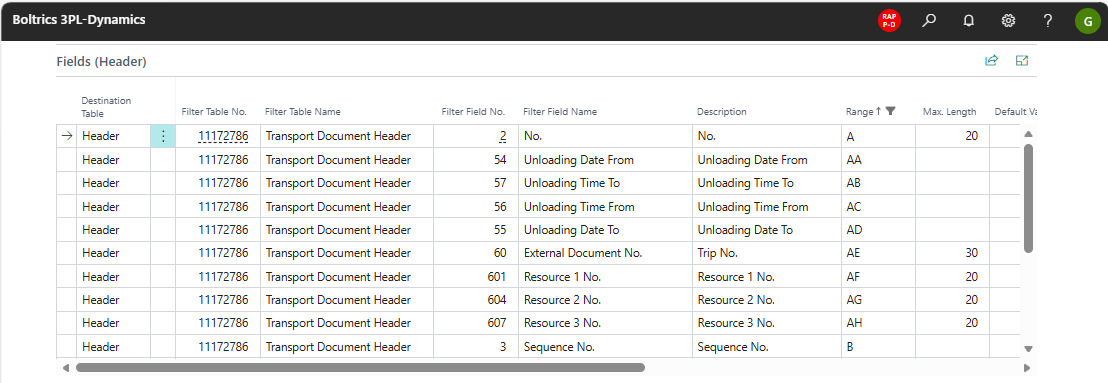
Tab: Line
For each table/field a line is created automatically. Only lines containing a value in the Column: Range value or a Default value will be imported.
Fields
Destination Table: Fixed value: Header.Filter Table Name: Fixed value: Transport Document HeaderFilter Field No.: The number of the field in the 3PL Table.Filter Field Name: The name of the field in the 3PL Table.Description: The name of the field in the the 3PL Table in the language of the user.Range: The column number of the Excel file which contains the data to be recorded in the field.Max. Length: The maximum length of the value to be imported from the Excel field.Default Value: When filled the value will be set in the field.Mapping Code: Additional functionality to convert values from the Excel file into other values in the 3PL table field.Format: -Split Document: not applicable on the Excel Import Trip.Type Code: -Skip Row Filter: -
Best Practice Example
The following steps describe how to create new trips using the Excel Import Format.
Step 1. Create and release Orders
The normal process of creating and releasing Orders is applicable.
Step 2. Create Sections
The normal process of creating Sections when releasing Orders is applicable.
Step 3. Export data to Excell
By providing carriers with access to the 3PL Web Portal, carriers can consult the Sections to be planned. From the portal the data can be downloaded into a Excel-file.
Click on (Excel Trip Import) to download an Excel-file with some demo-data.
Step 4. Carrier: Add trip-data to Excell file
The carrier can update each line in the Excel-file with the trip information. See the following list of fields.
Fields to be filled by the carrier
Trip No.: Will define to which Trip the Section belongs. Multiple lines can be assigned to a Trip. The value: Trip No. will update the 3PL-field: External no..Carrier No.Will update the 3PL-field: Carrier-No. on the Trip. This field is not mandatory.Plan Department.Will update the 3PL-field: Plan Department on the Trip.Plan Box No.Will update the 3PL-field: Plan Box No. on the Trip.Loading date from: Will update the 3PL-field: Planned Starting Date in the related Planned Loading Activity on the Trip.Loading date to: Will update the 3PL-field: Planned Ending Date in the related Planned Loading Activity on the Trip.Loading time from: Will update the 3PL-field: Planned Starting Time in the related Planned Loading Activity on the Trip.Loading time to: Will update the 3PL-field: Planned Ending Time in the related Planned Loading Activity on the Trip.Unloading date from: Will update the 3PL-field: Planned Starting Date in the related Planned Unloading Activity on the Trip.Unloading date to: Will update the 3PL-field: Planned Ending Date in the related Planned Unloading Activity on the Trip.Unloading time from: Will update the 3PL-field: Planned Starting Time in the related Planned Unloadinng Activity on the Trip.Unloading time to: Will update the 3PL-field: Planned Ending Time in the related Planned Unloading Activity on the Trip.Truck no.: Will update the 3PL field: Resource 1 – Truck No. on the Trip. This field is not mandatory.Trailer no.: Will update the 3PL field: Resource 2 – Trailer No. on the Trip. This field is not mandatory.Driver no.: Will update the 3PL field: Resource 3 – Driver No. on the Trip. This field is not mandatory.
Step 5. Excel Import Trip
By opening the page: Excel Import File, selecting the line related to the trip-import and clicking on the action: Import Document a window will be opened to upload the Excel-file. Drop the file in the window and click on OK.
Step 6. Create Trips
After the process of uploading the Excel-file automatically Trips will be created and the Sections will be planned on the Trip.